Showing posts with label SysAdmin. Show all posts

Friday, November 23, 2018

Fix: Windows 8.1/10 Black Screen with Cursor at boot

After upgrading my home laptop systems to Win 10 I began to notice a trend; every couple of times I tried booting the system I would be presented with a black screen and a blinking cursor…but no Windows 10 load.

Fortunately, powering the system off and then back on would allow the Win 10 OS to load OK.

It was an annoyance and signal that something was wrong, but nothing that this workaround wouldn’t address.

Then we upgraded our laptops at work to Windows 10 and started noticing the same behavior.

And our Surface Pro 3 users also occasionally complained about similar behavior.

After careful troubleshooting and searching the Internet, I fixed this particular problem on all our platforms by disabling “Fast Startup” in the power settings.

I’m not 100% why it seems to impact mobile platforms rather than desktops, but I suspect the fact that it involves loading the system from a specially saved/crafted “Fast Startup” hibernation state, if some hardware gets removed or not-detected between power-states – for example USB devices or the dock-station - it might cause the wake-up process to hang.

To fix this particular problem first go into the “classic” Control Panel for Windows, and into the Power Options applet.

On the left-hand side, select “Choose what the power button does”

Near the top of the loaded page to the right, select the “Change settings that are currently unavailable”  (note you may have to confirm a UAC prompt and provide admin-level credentials).

Once you do that, more options will appear below.

Uncheck the “Turn on fast startup (recommended)” checkbox.

Select “Save changes”.

That fixed my laptop issues at home, and by pushing this out to our systems as a standard configuration setting, it fixed the issues at work too.

More technical resources:

Cheers!

--Claus V.

Win 10 Laptop Storage Space-Drain Solved!

A lifetime ago (back in July) I was struggling to understand why my Win 10 workplace laptop’s hard-drive was running out of storage space.

grand stream dreams: QuickPost: PowerShell Scripts and Win 10 Helps

Despite my best efforts the 500 GB HDD had gotten down to about 60 GB – 80 GB of free space despite some pretty severe Windows space-hog/temp-file cleaning work.

That post detailed a number of PowerShell scripts I was using to try to find out the source of the space usage.

Reminder – because this was a work-laptop, my use of the normal third-party storage analysis tools I would rely on was verboten.

After several weeks of running modified versions of many of these scripts I was nowhere closer to finding the issue. I had lots of data, but the results suggested that the file or folder where the space eating usage had happened was off-limits to typical admin-level scripting runs.

Just before giving up and planning for a system reimage, I had an epiphany; Windows 10 comes with a built-in Storage Sense platform to let you understand (at a very high-level) space usage of your local drives in a categorized manner!

How to manage Disk Space & Storage using Windows 10 Settings – The Windows Club

Go into Settings (the gear icon in Win 10), select “System”, on the left side-bar select “Storage”, then click on one of the local system drives at the top you want to explore under the “Storage” section.

Let it run for a moment and it will then give you a report of storage use.

In my case it was immediately apparent that the “System & reserved” section was where the maximum file-usage was occurring; way more than a baseline Win 10 laptop in our enterprise.

You can click on any section and dive deeper into that.

That revealed that I had over 250 GB of files related to “System Restore”.

This was an interesting find as our Group Policy turns off System Restore. A visual check of all the options and settings under “Manage system restore” confirmed these were all disabled…so what was there and how did it get there?

VSSAdmin to the rescue!

I opened an administrator-elevated CMD window and ran the following command:

vssadmin list shadows

That revealed one “orphaned” shadow copy file created quite some time before I actually noticed the space drain.  A check of our operations logs for that timeframe couldn’t find any obvious actions or infrastructure routines that should have created it. So how it was triggered remains a mystery.

With the shadow copy ID known now I next ran this, using the actual ID # I found for that argument variable:

vssadmin delete shadows /Shadow={shadow copy ID}

It ran for quite a while, but then returned back to the blinking prompt cursor.

Another “vssadmin list shadows” confirmed it was gone, and a look at the local drive properties showed my space usage was back to a normal level with lots of free space available again.

Mischief managed!

More resources:

Cheers!

Claus V.

Friday, October 12, 2018

QuickPost: Removing Trend Micro Worry-Free Business Security Agent without the password

Not too long ago one of the ministry departments of the church-house needed a computer set up in their room to help manage things.

We had an older Dell laptop that was a beater, but was a business class device that still retained more than adequate performance.

It took me the better part of a weekend to bring the Win 7 Pro OS back up to a fully patched and updated state and clean a lot of older/abandoned applications off.

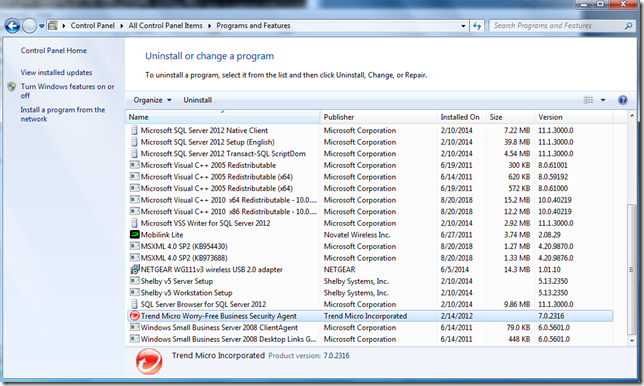
One of my last tasks was to remove the long-expired Trend Micro Worry-Free Business Security Agent off the system.

add-remove

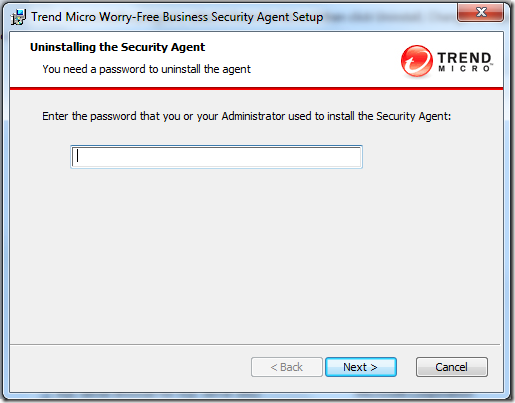
Before the uninstaller can complete, you must provide an administrator-set password (as a security feature).  Unfortunately, the admin who set it had long-since left the congregation and no documentation was left as to what it could be.

password

Bother.

Luckily, PowerBiz Solutions “down-under” had a promising tip:

How to uninstall Trend Micro’s Worry Free Business Security client agent without the password - PowerBiz Solutions

Note: The referenced link back to Trend Micro’s solutions page is now “404” but PowerBiz’s post provided a good start: (Update: Archived Trend Mircro solutions page via Wayback Machine – hat-tip to TinyApps bloggist!)

Basically, it involves setting the registry key “Allow Uninstall” to 1.
For WFBS versions 5.x and 6.x, this key is located here – HKEY_LOCAL_MACHINE\SOFTWARE\TrendMicro\PC-cillinNTCorp\CurrentVersion\Misc
For WFBS versions 7.x, this key can be found here – HKEY_LOCAL_MACHINE\SOFTWARE\TrendMicro\UniClient\1600\Misc

In my particular case, the version appeared to be 7.x.

version

A quick look in the Registry found the “AllowUninstall” key.

Capture-reg

…which I then changed to the needed “1” value.

Capture-regchange

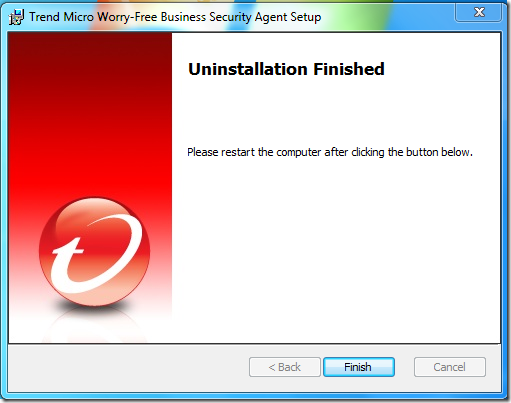
Once set, I was then able to go back and run the uninstaller without any password prompt.

success

Done

Success and done!

I then followed it up with a Microsoft Security Essentials installation that went on without issue and will provide sufficient real-time protection and current signature updates for AV/AM protection.

Cheers!

--Claus V.

Sunday, July 29, 2018

QuickPost: PowerShell Scripts and Win 10 Helps

Since having a system migrated to Windows 10, I’ve noticed a trend of the hard-drive getting significantly fuller now.  I’ve done all the standard post-migration cleanups. I cleared over 40 GB of old software packages off the system and was feeling pretty good.  The next day all my space-gains were lost and I was back at 100 GB of free space where I started.

I suspect there is some caching activity going on in the background and that it running off a quota that keeps me returning to the magical 100 GB free of a 500 GB drive.

Normally, I’d just run one of these tools to identify the space/file hogs and start cleaning up. I’ve ordered these in my general preference; though I like them all for slightly different things they bring to the table on a space-hunt.

However in this case I cannot use any third-party tools and must stick with using Microsoft OS-based solutions only.

So that led me to find a script I could use in PowerShell.

I’ve divided them into file-size analyzers and folder-size analyzers.

I found it is relatively easy to hunt down singular files on your system in PowerShell that are the largest. However, what happens if you have a bunch-load of very small files? Individually they may never float to the top, however in aggregate, they could add up to a lot of space usage.

I’ve listed these as well in my order of preference.

Note: They all seemed to run fine on my Win 10 systems in PowerShell ISE – though tweaking was needed for each one to target specific folders and/or report outputs – depending on the script.

PowerShell File-Hog Hunters

PowerShell Folder-Hog Hunters

If you do export output to CSV and don’t “pre-format” the bytes output to MB, here is a tip on a custom formatting rule in Excel you can use to make it more readable.

formatting - How can I format bytes a cell in Excel as KB, MB, GB etc? - Stack Overflow

I’ve not loaded Ubuntu on Windows to have a Bash console, but in looking for tools, I came across this that looked pretty neat: ncdu: Identify Large Files on Windows 10 - Trevor Sullivan

Finally, on Win 7 I used a pretty small set of common keyboard shortcut to navigate my way around the system.  In Windows 10, I’m finding a desire to expand my quick-access key combo skills. Here are some good resources:

If I’ve missed a useful script or you have any tips for hunting for space/file hogs using only “on-board” native Windows 10 OS tools, please drop a comment!

I expect I’ll be adding to the list of links in this post too as I uncover more PowerShell scripts that could be useful. As I post this, I think I am overlooking one or two others that I found useful

Cheers!

--Claus V.

Monday, September 05, 2016

Valca Windows KeyFinder Utilities

Last night I was culling my collection of Windows key-finding utilities.  There were some that had gone “404” and others that didn’t seem stable (or effectively work at all) on newer Windows 7/10 systems.

Many were collected back in the days of Windows XP so I decided to pick through them and dump the oldest ones and add some new ones.

This morning I saw that the TinyApps.org bloggist was hard at work on his own list!

Possibly we are being confronted with similar troublehsooting and service issues?

Here is my list and there are some similarities (as presented in semi-alphabetical order).

Some of these recover more than just the Windows OS key.

Some have not been updated in a while and may not work effectively on Win 7/8/8.1/10.

Then there is there is the manual method using CMD or PowerShell for most Win 10 / 8 / 8.1 systems.

I tend to prefer ProduKey, ShowKeyPlus, and Windows OEM Product Key Tool as my primary tools.

Cheers,

Claus Valca

Lenovo Y50 Hard Drive Replacement and Windows 10

About a month ago I was asked by a family at the church-house if I could give them some advice about their son’s two-year-old Lenovo Y50 laptop.

Apparently the hard-drive had failed and time was short before he headed off to college out of state.

They had purchased a new 1 TB Western Digital laptop drive similar to the one in it but despite good effort had been unable to get Windows 10 reloaded on the device. They suspected more was wrong with the system and wanted to confirm before picking up a new laptop before he shipped out.  Basically, they said the BIOS detected the HDD but they could not get Windows 10 reloaded on the laptop.

I asked them to let me look at the system along with the bits and pieces and then I would let them know.

So, armed with my various troubleshooting tool kits and USB sticks I sat down in our sound-booth with it and ran a quick assessment.

I’m more of a Dell-guy and hadn’t had much experience with the Lenovo line. As such, getting into the BIOS took a bit of research.

The trick was something called the “NOVO” button.

I booted into the BIOS (on the Y50 using the NOVO button to the immediate left of the power button) and checked a few things.

I was able to confirm the BIOS was picking up the new HDD. 

I look under the boot tab options and saw that it was set to EUFI.

I changed it temporarily to “Legacy” and saved. I needed it that way for the next step to work more smoothly in my troubleshooting assessment. 

I attached one of my custom USB sticks that I can use to boot a system and load/run an OS (Windows/Linux/Whatever) directly from the USB stick and not off the local HDD. 

I then hit the NOVO button again and selected to boot from my USB stick. That allowed me to load a WinPE build and run some commands to…

  1. confirm that I could see the new HDD,
  2. confirm that it was a 1 TB drive,
  3. rebuild the drive partition configuration (MBR type) and make it bootable, and then
  4. formatted it as NTFS using DiskPart from a command prompt window.

        1. Diskpart
        2. > select disk 0
        3. > clean
        4. > create partition primary
        5. > active
        6. > assign letter = C
        7. > exit

Followed up by a final

format C: /fs:ntfs /q /y

It worked perfectly. That confirmed the laptop recognized the drive while running under a Windows OS and it was working as expected. Now I needed to get the Win 10 OS loaded on the hard drive.

I shut it down and rebooted it again with the NOVO button. I went back in to the boot options tab and set it back to UEFI, saved the changes and rebooted. 

This time I had swapped USB sticks and now used a Windows 10 Installation Media USB that I had previously built when I was working on my own laptops a while back.

The Win 10 lnstaller loaded and the setup wizard started.

Only I had forgotten that the HDD was still configured as MBR with my pre-testing. 

Win 10 and UEFI BIOS support enabled didn’t like each other and the wizard refused to continue with the installation. So at that point in the installation options I had to just delete the MBR partition I had made so Win 10 could automagically create the partition again as a GPT type which it required. 

It did and then the rest was just watching Win 10 install, reboot a few times, creating a local user account, and dumping on the OS updates. 

Because it had Win 10 on before, it automatically loaded the license key from BIOS storage and activated Win 10 once fully installed and after I connected it to the Internet. 

Done. The Y50 was a sharp looking (and running) laptop and I was impressed during my short service time with it.

Note: I had planned on looking at the failed hard-drive to see if any data could be recovered and ported back over onto the new drive, but they said that wasn’t needed and would just go with a fresh-start. I left it to them to follow up with any remaining software application reinstalls as well.

I didn’t kick off the new Win 10 "Anniversary Edition" build update release since this was to be just a short “assessment” service but told them that it should eventually auto update in a week or so. I also let them know they could force it on early by heading over to this Microsoft site page and following the instructions. 

And I advised them to keep these link handy as well. 

                The family didn’t have to shell out for a new laptop and all was well.

                Cheers.

                Claus Valca


                Additional reference notes:

                Saturday, June 25, 2016

                Windows Service Triggers

                I was troubleshooting some issues with WSUS server updating firing off on some Surface Pro tablets the other week.

                In doing so, it seemed the root cause was that the Windows Update Service was set to not run full time or Automatically but rather manually and based on service trigger starts.

                Hmmm. Time to learn me some facts about Windows service triggers.

                Now we know!

                --Claus Valca

                Yep, it broke things…MS16-072 (that’s by design folks!)


                Let it be said, let it be applied, so be it now broken, so be it now removed.

                Thus sayeth the sysadmin.

                Now let’s go fix it…well, you know…

                Cheers,

                --Claus Valca

                Telenet Clients

                This week I was working with a network team-member to pilot some changes that will lock our network switches down more tightly.

                I’m used to using PuTTY Portable or KiTTY Portable which are simply portable versions of PuTTY and KiTTY and seem hands-down better than Microsoft’s Hyperterminal that got left behind when Windows 7 came out (although it can run just fine on WIn 7 if you copied the snagged binaries over).

                However, the network admin I was working with requested we use the terminal Poderosa.

                Apparently Poderosa has been out for a very long time and I’m just now finding out about it.

                What makes it very nice – aside from the beautiful GUI – is the “tabbed” nature of the application so you can have multiple sessions running and organized very similarly to browser tabs.

                It felt very natural and easy to use and is pretty light and fully portable.

                Like other telnet clients you can change the back color, text color, and font for improved legibility. The buffer size can be adjusted to allow capture of more of the session content, and copy/paste support feels more natural (IMHO).

                GSD Bonus:

                Don’t forget these great Cisco reference sites:

                Cheers.

                --Claus Valca

                Monday, May 30, 2016

                Windows “Service Pack”, Slipstreaming, ISO files, misc.

                Wow.  Big thanks to Lavie for being patient with me while I hammered out all these blog posts.

                I’ve still got quite a lot more, but it has been a very productive – non-productive day off.

                Cheers!

                Claus Valca

                Western Digital Encrypted Hard Drive “gotchas”

                Good information to know if you use a Western Digital encrypted hard drive. Not breaking news but still good to be familiar with – especially if your organization uses them!

                Wow.

                Claus Valca

                Wrestling with Outlook Troubleshooting

                I’ve found myself working on Outlook (Outlook client, Windows Live Mail, Office 365) issues much more often than usual.

                Here is a collection of reference links.

                Outlook/Office 365 Troubleshooting Tools

                • Office Configuration Analyzer Tool (OffCAT) information – Microsoft Support
                  The Microsoft Office Configuration Analyzer Tool (OffCAT) provides a detailed report of your installed Office programs. This report includes many parameters about your Office program configuration. It also highlights known problems that are found when OffCAT scans your computer. For any problems that are listed in the report, you are provided a link to a public-facing article (usually a Microsoft Knowledge Base article) about each problem so that you can read about possible fixes. If you are a Helpdesk professional, you can also save the report to a file so that it can be viewed in the Office Configuration Analyzer Tool on another client on which the tool is installed.
                • Download Microsoft Office Configuration Analyzer Tool 2.1 - Microsoft Download Center
                • Fix Outlook and Office 365 problems with the Microsoft Support and Recovery Assistant for Office 365 – Microsoft Office
                  Support and Recovery Assistant for Office 365 can help you automatically diagnose and fix a range of Outlook problems. You will need to download the application to your local computer, sign in with your work or school account and select the issue you want help with. The application will run a series of diagnostic tests and help you set up a new profile. If any of the tests fails, it will provide suggested solutions to get your problem solved.
                • New tool for helping resolve Office 365 issues - Office Blogs
                • Fix Outlook account problems in Office 365 - Office 365 Support

                Outlook Management Tips

                WIndows Live Mail

                Outlook.com/Hotmail.com and Outlook Client

                Cheers,

                Claus Valca

                Sysadmin Tools and Tips Linkfest: Part II

                Mores…

                Windows Updating and Patching – Tips and Tricks

                Windows Troubleshooting and Tips

                Windows Tools

                Windows PowerShell

                Microsoft News Bits

                Cheers,

                Claus Valca

                Sysadmin Tools and Tips Linkfest: Part I

                More goodies for the Sysadmin crowd!

                Cheers,

                Claus Valca

                Suface Pro SysAdmin Linkage

                This is one of the piles of collected linkage that I have been working hard to get to and post.

                Supporting Surface Pro devices is a never-ending challenge. They operate differently than our other laptop/desktop platforms and require a different set of tools and utilities for troubleshooting core device issues.

                So here are some critical tips and resoure links.

                Surface Pro Device Firmware and Drivers

                Surface Pro power cord issues

                Surface Pro Diagnostic Toolkit

                Note the Toolkit files that stand out to me are:

                • Surface_Data_Eraser_Installer_v3.1.9.msi
                • Surface_Diagnostic_Toolkit_v1.0.88.0.zip
                • Surface_Dock_Updater_v1.0.8.0.msi

                Surface Pro Tips and Tricks

                Surface Pro Data Eraser Utility

                This is important as the Surface uses a SSD drive and “normal” secure wiping techniques may not be effective. Using the Microsoft Surface Data Eraser tool should ensure a secure wipe occurs before the device is repurposed or returned to Microsoft for service.

                Surface Recover Image

                Cheers,

                Claus Valca

                Ongoing consumer product security issues

                Note: most of this is “old news” now. Posted for posterity.

                If you do use a Logitech wirless mouse/keyboard with a Unifying receiver, follow that last link above to install the new Unifying Software package, then do a firmware update on the device. Now would be a good time to check and upgrade your SetPoint software as well. GSD tip here.

                …moving on…

                Claus Valca

                Network Link Roundup

                And yet another pile of URL web-linkage. This collection focuses on network techniques, tools, and software releases.

                Grab a fork and dig in!

                Cheers.

                Claus Valca

                Found Applications, Utilities, and Miscellany

                Here is a bunch of stuff that I’ve collected over the past several months but never go around to posting.

                Maybe you will discover something new or interesting in this mess.

                Cheers!

                Claus Valca

                Quickpost: that whole Bash on Windows thing

                Old news; just a collection of links for future reference.

                Moving on…

                Claus Valca

                TRAINING: Windows Security & Forensics

                “New” Microsoft Virtual Academy training course spotted.

                Topics:

                1. Windows Security and Forensics
                  Take a look at the current state of the security landscape, Windows Security, and what "computer forensics" are.
                2. Windows Memory Attacks and Forensics
                  Learn how and why hackers attack a system’s memory, and see how Memory Forensics can help address the problem.
                3. Windows Authentication Attacks and Forensics
                  See demonstrations of how attackers use credential dependencies to gain elevated access to systems and to perform lateral movement. Plus, learn how to detect and prevent many of these attacks.
                4. Windows Forensics
                  Explore Digital Forensics, and find out what to do as a first responder to preserve evidence for legal actions.
                5. Network Forensics
                  Explore network forensics, along with case studies, best practices, and online analysis techniques.
                6. Malware Incident Response
                  Learn about malware incident response, including identifying, locating, and removing malware.
                7. Windows 10 Forensics
                  Take a look at Windows 10 forensics, and hear about new security features and innovations that can help forensic experts with their work.

                Learn the following through this course:

                • Examine how and why hackers attack a system’s memory.
                • Identify how attackers use credential dependencies to gain elevated access.
                • Review what to do as a first responder to an attack; learn to preserve evidence for legal actions.
                • Explore network forensics.
                • Learn about innovations of Windows 10 that can help forensic experts do their jobs.
                • Learn the basics of computer forensics.
                • See how to respond to malware incidents.

                This won’t instantly make you a professional forensicator it looks to give sysadmins a well-rounded introduction into key topic and foundational approaches when deciding where to begin – if there isn’t already a formal support structure in your organization for these items.

                Claus Valca