Saturday, April 26, 2014

Playing Nicely Now: Xplico 1.1.0 & Ubuntu 14.04 LTS

OK, in the grand scheme of World Events, getting the latest Xplico release to update/install in the latest Ubuntu LTS release isn’t that critical.

But it does get frustrating when something so easily-difficult turns into being something a case of something so difficultly-easy to solution.

Submitted for your entertainment and education, upgrading both Ubuntu 14.04 LTS and Xplico 1.1.0.

I’ve covered more than a few guides now here at GSD on getting Ubuntu upgraded in my VirtualBox session. Each time it goes a bit more smoothly than the last.

Likewise, getting Xplico installed the very first time on my own (rather than using it in a pre-bundled virutal machine appliance or LiveCD distro) was quite the effort.

Fortunately, after contacting the wonderful team at Xplico, they added some super-easy “scripts” to their wiki page to make the process a breeze for Ubuntu builds up though 13.10.

So what could go wrong this time?

Apparently still quite a lot.

First, let’s cover the Ubuntu upgrade using the well-worn GSD process.

Here you go…documented for your entertainment and my education.

  1. Find in RSS feeds that my Ubuntu 13.04 Raring Ringtail install has a Ubuntu 14.04 LTS Trusty Tahr update available.
    ●  Ubuntu 14.04 review: Missing the boat on big changes - Ars Technica
    ●  Ubuntu 14.04 "Trusty Tahr" Brings Small Changes, Long-Term Support - Lifehacker
    ●  Ubuntu 14.04 LTS is here -- Linux fans, download it now! - Betanews
    ●  Ubuntu 14.04 review: Trusty Tahr adds finesse and choices to the Ubuntu desktop - Desktop Linux Reviews
    ●  TrustyTahr/ReleaseNotes - Ubuntu Wiki
  2. Made sure my Oracle VM VirtualBox platform I run it is is current. Upgrade accordingly first.
  3. Excitedly start the in-place upgrade of my VirtualBox Ubuntu build.
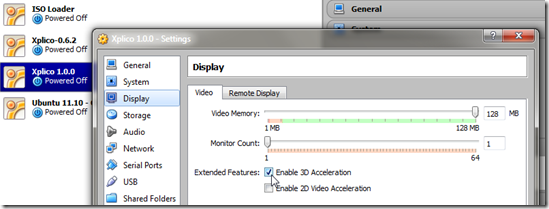
  4. Play it safe to prevent VirtualBox upgrades messing with Ubuntu by first disabling 3D acceleration in the VM machine settings.
    hk3ijk2t.dbz
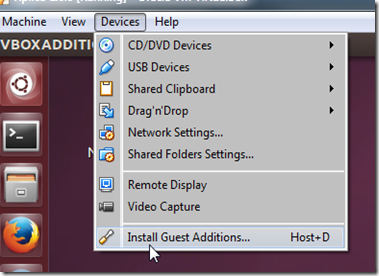
    Then install/upgraded to the latest VirtualBox Extension pack within Ubuntu proper. Unlike last time I knew what the correct option clicks to get the Extension pack installer auto-running after I mounted the CD/ISO file.
    1. First, run the installer from the host.
      rlkvvpwv.u4z
    2. Next choose the “Ask what to do” option.
      egm215wp.p3c
    3. Run the auto installer
      zdshppbk.nv0
    4. Authenticate and install
      rf4k25to.2tb
      ●  How do I install Guest Additions in VirtualBox? - Ask Ubuntu.
      ●  Installing Guest Additions on Ubuntu - VirtualBoxes
  5. Once done, I rebooted the system after re-enabling the 3D Acceleration option in the VM settings.
  6. From there I continue my previous successes by using Daniel Benny Simanjuntak’s tip in a previous Ubuntu post comments to run the following command from the terminal to start the upgrade process.
         …through terminal one can upgrade as well using the command:
          sudo do-release-upgrade -d
  7. For an alternative method found check out this Upgrade Ubuntu 13.10 (Saucy Salamander) to Ubuntu 14.04 (Trusty Tahr) via Tecmint.com post.
  8. Let it run for a while…do a few reboots…looks like a Flash package is causing some non-fatal errors…moving on anyway… 
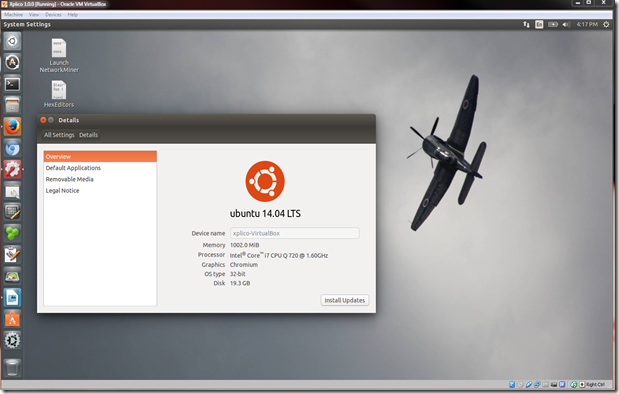
  9. When it is all settled down, I log in and kick the tires a bit, and change the desktop to the more dramatic “Sea Fury” image from the pickings offered.
    zy43p4pb.tg0
  10. Looked for and updated any pending applications needing updating. Done.
  11. Check “Upgrade to Trusty Tahr” off my to-do list.

So far so good.

Second, let’s cover getting Xplico working again.

So despite some fairly recent updates with Xplico - Open Source Network Forensic Analysis Tool (NFAT) having come out, for my simple purposes, I’ve been running the Xplico 1.0.0 version up to this point in my previous Ubuntu builds.

As previously mentioned, the Xplico development team (specifically the most gracious and patient Gianluca Costa) kindly corresponded with me after I asked some follow-up questions to my Self-Installing Xplico in Ubuntu post. That eventually helped lead in a small way to:

  • Xplico 1.0.0 Released - with notice of the new Xplico Repository and
  • the fantastically helpful ubuntu page in the Xplico Wiki giving you the following install options from:
    • The Xplico Repository (currently for Ubuntu 11.04 through 13.10)
    • SourceForge for both Ubuntu 12.04 and Ubuntu 11.04 & 11.10)

Knowing that the Xplico team had recently released Xplico 1.1.0 in late December with some nice feature enhancements, I thought it was finally time to do the upgrade.

First, I launched Xplico 1.0.0 from within my Trusty Tahr machine…and it completely and totally failed to work.

Might have something to do with all that “Apache” stuff I noticed going on during the upgrade to 14.04 LTS perhaps?

No problem…I’ll just go back and reinstall the older Xplico 1.0.0 version using any of those handy Xplico “scripts” on the Wiki page.

Fail.

My first attempt was to use the first installation method from the Xplico repository.

That seemed to “mostly” work except it didn’t really work cause embedded in all the Terminal output were these potential issues:

Err http://repo.xplico.org trusty/main i386 Packages                          
  404  Not Found

and

W: Failed to fetch http://repo.xplico.org/dists/trusty/main/binary-i386/Packages  404  Not Found

E: Some index files failed to download. They have been ignored, or old ones used instead.

Yep…not going to work or continue with the build process with those buggers.

OK, lets move on to the SourceForge package source/method.

Snap, same errors…

Well, granted, I may have been rushing things out the door, maybe waiting a few days would help and the repositories could just happen to be off line.

So I came back a few days later (OK, just this morning) and tried again netting the same results.

So, being a somewhat clever and resourceful person, I did what most folks wouldn’t dare think about doing to fix a technical problem in a area (Ubuntu) they don’t know enough about; I fired up the email and asked for help from the most gracious and patient Gianluca Costa.  Funny thing is his email to me back from January 2012 is still sitting in my Inbox, one of about 8 emails I keep there for quick reference or encouragement. I knew there was a reason for that.

Less than 30 minutes later, from across the globe, came a wonderfully helpful response with the following critical bits amongst some other nice content:

If you like to test the 14.04 packages, their links are:
http://projects.xplico.org/xplico_1.1.0-14.04_amd64.deb
http://projects.xplico.org/xplico_1.1.0-14.04_i386.deb

After checking with him first, Gianluca kindly allowed me permission to share that information with you. Please do note these are still a work in progress and some fine-tuning might occur before their “public” release which should happen very soon...but if you are struggling for Xplico 1.1.0 to get working and just can’t wait, there you go.

Probably for a seasoned Ubuntu professional, that would be all the information needed to get Xplico going again…alas…not so much for me; at first.

Here’s how I finally got it going about an hour after getting the package repository links.

Now to be clear and fair, I did need to make some fresh coffee during the process. So it didn’t really take me an hour total! But then again in more honesty, I made the fresh coffee using a K-cup machine Mom and little Bro gifted me for house-sitting…so the coffee making process didn’t take as long as one might think. Seriously…just a few minutes. Cheese-and-crackers! …now that explanation seems to make it look like it did take me closer to an hour…umm maybe I slowed down to savor that rich Italian roast blend I had to honor Gianluca for his reply?

Moving on…

  1. In Ubuntu, I opened up Firefox and downloaded the “xplico_1.1.0-14.04_i386.deb” package to my downloads folder.
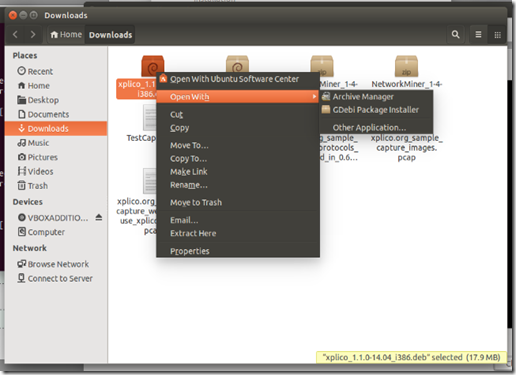
  2. I then right-clicked the package and selected Open With the “GDebi Package Installer” as that seemed as cool a thing to do as either of the options offered.
    5zyleuxy.k1z
  3. It needed some prompts answered, but it ran OK until near the end when I got this:
    oclyluha.buq[5]
  4. That did NOT look promising…but I can follow instructions like a few people can
  5. I opened a fresh Terminal window and ran “sudo apt-get install -f”
  6. That did a bunch more things. I’ve saved the text output to place with Alvis’s early macaroni art pictures from kindergarten class but here are the highpoints (yes…I’m leaving some things out for brevity…like that matters at this point in the blog post):

      The following packages were automatically installed and are no longer required:
        libquvi-scripts libquvi7
      Use 'apt-get autoremove' to remove them.
      The following extra packages will be installed:
        apache2 libapache2-mod-php5 libpq5 python3-psycopg2
      Suggested packages:
        apache2-doc apache2-suexec-pristine apache2-suexec-custom php-pear
        python-psycopg2-doc
      The following NEW packages will be installed:
        apache2 libapache2-mod-php5 libpq5 python3-psycopg2
      0 upgraded, 4 newly installed, 0 to remove and 10 not upgraded.

      Setting up libpq5 (9.3.4-1) ...
      Setting up python3-psycopg2 (2.4.5-1build5) ...
      Setting up apache2 (2.4.7-1ubuntu4) ...
      * Restarting web server apache2

      Setting up libapache2-mod-php5 (5.5.9+dfsg-1ubuntu4) ...
      php5_invoke: Enable module pdo_sqlite for apache2 SAPI
      php5_invoke: Enable module opcache for apache2 SAPI
      php5_invoke: Enable module readline for apache2 SAPI
      php5_invoke: Enable module json for apache2 SAPI
      php5_invoke: Enable module sqlite3 for apache2 SAPI
      php5_invoke: Enable module pdo for apache2 SAPI
      apache2_invoke: Enable module php5
      * Restarting web server apache2

      Setting up xplico (1.1.0-14.04) ...
      Installing new version of config file /etc/apache2/sites-available/xplico ...
      Installing new version of config file /etc/init.d/xplico ...
      Module php5 already enabled
      Module rewrite already enabled
      * Starting  Xplico 

    1. Done! And those [OK] tags I saw in the process were very comforting.
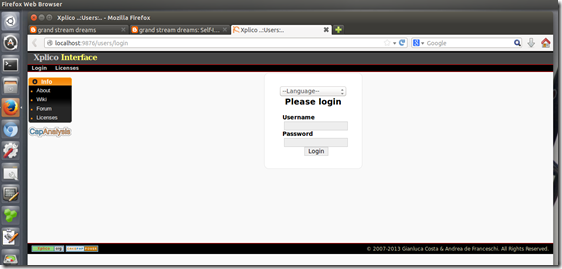
    2. I then relaunched Firefox using a custom profile setting I have configured for Xplico usage and browsed to “http://localhost:9876/users/login”
    3. Looking like this may turn out well!
      dk5fjo34.qdm
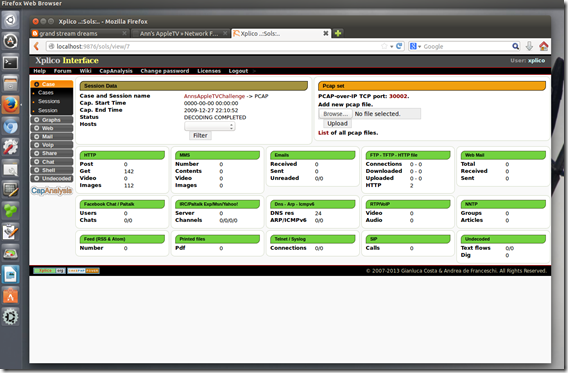
    4. Logging in and looking at my testing “cases” everything was back to normal again. Sweet!
      gefm2xcy.g34
      Note: PCAP file shown above collected from Network Forensics Puzzle Contest site; contest #3.
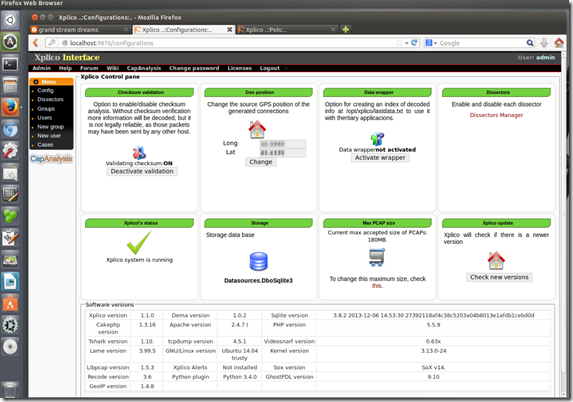
    5. Next I logged in as admin to check out the installation details to confirm Xplico was 1.1.0
      4njasmdb.hr0
    6. Yep! It’s a little hard to see there but here you go.
      z5eii1xn.wbc
    7. All is well.

    Xplico 1.1.0 is now running nicely in my Ubuntu 14.04 LTS virtual machine.

    I’m even more wiser for the process thanks to the kindness of the developer.

    I’ve got another blog post to add to the (eventual) GSD Xplico mega post that I keep collecting more material for.

    All is well in the world!

    Cheers!

    Claus Valca


    P.S. More images from the “xplico_1.1.0-14.04_i386.deb” deb package details when it was all said and done for the curious

    Xplico 1.0.0 [Running] - Oracle VM VirtualBox_2014-04-26_10-18-06

    Xplico 1.0.0 [Running] - Oracle VM VirtualBox_2014-04-26_10-18-32

    ForSec Linkpost

    …and here is a hand-picked selection of particularly practical and informative ForSec links.

    I’ve been very busy these last several months as we have worked almost non-stop at the office to migrate our platforms from Windows XP to Windows 7 so my energy level and free-time is only now catching back up in my personal life.  New books to read and review, stuff like that.

    Whew!

    Hopefully some more normal and original (as in “contributory” rather than re-linking) GSD blog-content posting will follow moving forward.

    And now for a change of pace…

    • DEFT 8.1 and DART 2 2014 - DEFT Linux - new version releases of the LiveCD platform and accessories.
    • Index of /files/dart - So DART 2 2014 is basically a collection of Windows applications bundled in a slick and well-organized launching platform that can help with some forsec activities if you aren’t using the Linux DEFT bootable OS. Use of these tools on a life system in most cases will not be forensically sound “out of the box” but the situation may call for their usage. Certainly they present a convenient and well-rounded way for knowledgeable sysadmins and responders to have a great collection of tools in one place.
    • CAINE Live CD/DVD - Alternative project to DEFT but similar in the approach. I mention it because previous versions were bundled with a DART-like Windows package called…
    • WinTaylor - (scroll down a bit to see/download the files), only WinTaylor has been superseded by the new…
    • Win-UFO package now included in CAINE.  Which leads us to this…
    • Win-UFO v4 Introduction (by Casey Mullis) over at LoveMyTool which provides a nice video introduction to this specialized Windows utility packaging.
    • WinFE Success Story - WinFE blog
    • Mini-WinFE Updated - WinFE blog. Brett Shavers highlights some exciting going-on’s in the WinFE world with the Mini-WinFE project.  Check out the comments on the post as Troy (Larson) makes mention on the benefits of “Windows to Go” as a  Win FE platform plus more as well as support in WinPE 5.1 for the “WimBoot” feature. And I had previously found this What is Windows Image Boot (WIMBoot)? post and shared in in my sysadmin-related post. Interesting options! Can’t wait to see where these new off-shoots might take us!

    Cheers!

    --Claus V.

    Tips and Tricks for the Sysadmin this week

    Found:

    Cheers,

    Claus V.

    Security (or lack thereof) In the News…

    First, some perspective…

    And now those hits that keep coming!

    I originally had lots and lots more linkage but after a certain point there comes that adage about dead horses and sticks…

    Cheers,

    Claus V.

    Notes on Network-y Stuff

    Here is a linkpost on network-related topics for the forsec and sysadmin crowds.

    Cheers,

    Claus V.

    A brief mention regarding MS EMET…that lengthens

    Let’s just let Microsoft explain what EMET is about for starters:

    EMET anticipates the most common techniques adversaries might use and shields computer systems against those security threats. EMET uses security mitigation technologies such as Data Execution Prevention (DEP), Mandatory Address Space Layout Randomization (ASLR), Structured Exception Handler Overwrite Protection (SEHOP), Export Address Table Access Filtering (EAF), Anti-ROP, and SSL/TLS Certificate Trust Pinning, to help protect computer systems from new or undiscovered threats. EMET can also protect legacy applications or third party line of business applications where you do not have access to the source code.

    Basically it keeps a specialized eye on your Windows system and tries to keep everyone at the card-game honest by blocking “tricky” program application methods that could be malicious.

    It doesn’t rely on traditional “file-based” signature checks like some AV products do but rather keeps in check what programs are allowed to do.

    Anyhow here are some related posts and links for more info…bear with me I’m going somewhere with this post…

    All that to say, that many moons ago, the dear TinyApps blogger sent me a tip towards the following security news post:

    Crash, bang, boom: Down go all the major browsers at Pwn2Own - ZDNet. From that article, the following observation was highlighted for me, emphasis mine:

    The other browsers were also in for more pain. IE 11, Firefox 27, and Safari 7 all got hammered before the competition came to an end. Only one hacker prize was left unclaimed--the "Unicorn" of a system-level code execution on a Windows 8.1 x64, in IE 11 x64, with an Enhanced Mitigation Experience Toolkit (EMET) bypass.

    I’m not sure if that result is a good thing or not…it’s hard to say it it proved too hard a nut to crack for any of the participants to even try…or they just had easier pickings to focus on.

    Pwn2Own 2014: A recap - PWN2OWN

    The largest single prize not awarded was the $150,000 for successful demonstration of the grand-prize Exploit Unicorn, a triple-play puzzle specifically designed to provide the greatest challenge for researchers. Though no entrants made that attempt, the record-setting number of entrants and the diverse and creative approaches taken to crafting attacks made this a Pwn2Own for the ages.

    The challenge?

    “Exploit Unicorn” Grand Prize:

    • SYSTEM-level code execution on Windows 8.1 x64 on Internet Explorer 11 x64 with EMET (Enhanced Mitigation Experience Toolkit) bypass: $150,000*

    For more background on this particular challenge:

    Pwn2Own’s New Exploit Unicorn Prize: Additional Background for Civilians - PWN2OWN

    This year at Pwn2Own, we’re hunting the Exploit Unicorn – not because we think there are a lot of researchers out there who can capture it, but because we think there aren’t. That said, an attacker able to win this prize (and $150,000 for their efforts) is able to break through Microsoft’s most powerful protections, including a tool built specifically to protect against sophisticated attacks. Here’s what we’re asking Grand Prize contestants to do:

    We begin with Internet Explorer. The latest versions of Internet Explorer run in a special, isolated area of the computer’s memory. Tech folk call that a “sandbox,” but you can think of it as a padded room where an application can spend time without hurting itself or others. The first step in the contest is to break out of IE’s padded room – using a fault in the construction of the padded room itself.

    Once that’s done, the contestant must gain control over the rest of the computer. The second challenge is for the contestant to locate and use more faults in the system to read its information, change its data, and eventually control its behavior as he pleases; the newest 64-bit computers make that tough, but a successful contestant will prevail.

    But there’s one more hurdle. Microsoft has software called the Enhanced Mitigation Experience Toolkit (EMET). It essentially builds more padded rooms inside Windows and protects against many kinds of attack techniques – including payloads installed by attackers seeking the Exploit Unicorn. The third and ultimate test for our contestants is to break through EMET protections and truly control the computer.

    EMET has been around for a few years, but due to a lack of formalized tech support and an intimidating interface, its adoption was limited. Lately, Microsoft has been leaning on EMET a lot more; there’s more support, it’s easier to set up, and they encourage the general public to use it – especially when a new attack is underway. With EMET carrying that kind of burden of protection, researchers are getting more interested in testing its limits, and our Grand Prize reflects that. We may not have any successful contestants, but security researchers thrive on insanely difficult challenges; we’re excited to provide one.

    I appreciated the link TinyApps provided and though there were no takers to the hack-challenge this time, it did give me confidence that use of EMET continues to be a wise (if not very well known) security choice.

    My current (home) Windows 7/8 x64 protection model deployment:

    • Home router -- fully patched with latest firmware updates available & specialized configuration settings that make all the family moan when they visit and want to share the Wi-Fi. Getting them joined is a secure (but tedious) process for everyone involved.
    • PC hardware running latest BIOS/OEM driver patches available
    • Windows 7/8 x64 OS’s - fully patched; including all third-party browser/plugin applications.
    • Windows Firewall stuff/settings
    • Microsoft Security Essentials (Win7) or Windows Defender (Win 8)
    • Malwarebytes Anti-Malware Premium - (plays nicely for concurrent protection with MSSE)
    • Microsoft EMET 4.1- (rolled back from 5.0 tech preview due to super-chatty nature for now)
    • Common sense (YMMV)

    This works for me currently…there are more-featured free Windows AV/AM products and I’ve tried many and still hate the performance hit right-after login MSSE causes on my Win 7 system. But the other free products have their own issues and I’ve not yet found a need to upgrade to one of the excellent non-free AV products that I would likely choose.

    The paid Malwarebytes application provides (IMHO) sufficient backing power to MSSE providing the additional layer of system protection I think is a good idea to have. The free version will do, but it doesn’t provide the real-time protection I think is needed nowadays. This combo is the balance of features and protection I’m comfortable with as a techie/sysadmin.

    There are also tons of excellent free firewall applications that go beyond Windows Firewall. I used to use and recommend many of them a long time ago here. However I’ve become a bit more genteel and am satisfied with the protection it gives me.

    Finally, There is EMET lurking in the background keeping a third watch out as well.

    Cheers,

    Claus Valca

    Get the latest Chromium Releases - Easy Peasy!

    I’ve done more than a few posts on Chrome/Chromium.

    I like using Chromium though it isn’t quite yet going to replace Firefox on my system for regular usage.

    In the past I was able to monitor new version releases reported on both the Chromium Blog and Chrome Releases sites.

    Then I could pop-over to a ftp location and pull the newest version down. Only that FTP site/method seemed to disappear some time ago as the developers changed things around a bit.

    I had to do it this way as I use the DEV version of the PortableApps package for Chromium - Google Chrome Portable. That’s all well and good but it doesn’t support internal updating of the version, and sometimes the updated release versions are slow in coming from the site.

    Fortunately I found a super-awesome website for us crazy hard-core off-the-map Chromium users who dare to use some of the most current release versions.

    Yes, yes…getting your files from a location other than the source is risky…I know. YMMV and all that.

    However after reading the site and checking the links provided for the sources (Google repository) I’m confident in using them.

    So now, here is what I do to more frequently update my PortableApps Chromium package:

    1. Hop over to this Wollyss.com page and Download latest Chromium release without bug (64-bit and 32-bit).  I use the x32 version.
    2. Download the “Chromium 32-bit (.exe) file; it is named mini_installer.exe.
    3. Unpack the exe file with a compression program like 7-Zip.
    4. Unpack the chrome.7z package step 3 results in with 7-Zip.
    5. Go over to my “<drive-letter>:\subfolder-name\GoogleChromePortableDev\App\Chrome-bin” folder
    6. …in that folder delete out the following:
      1. Delete the xx.x.xxxx.x folder containing the Chromium application files where the x’s will be the version number “installed”
      2. Delete the chrome.exe file
      3. Delete the wow_helper.exe file
    7. Now copy the folder/files created in step 4 from the “Chrome-bin” subfolder over to my own “Chrome-bin” subfolder.
    8. Done!

    Again, to be clear, the ONLY reason I’m doing this extra work is because,

    • I want to run Chromium in a “portable” mode, and
    • Sometimes I don’t want to wait for PortableApps to release a new version so I can update my portable version “the easy way”.

    Cheers,

    Claus Valca

    CSV apps of note

    Quickpost…here are some CSV file utilities of note.

    While the mighty Excel is hard to beat (or alternatively one of the Open Source freeware suite spreadsheet programs #1 #2 #3 to name a few), having a dedicated CSV file editor can help under certain circumstances.

    Here are the ones I like and carry on my USB stick.

    Cheers.

    --Claus Valca

    W6161X (or how to recover from Thunderbird slowness)

    I was almost ready to ditch Mozilla Thunderbird recently and go reconsider some options for an alternative email client.

    The primary reasons I like T-bird at home are 1) it works well for my more basic home email needs and 2) I recommend it to family and friends -- well except Dad who insists on using Outlook -- as their email client so it is “muy fácil” to walk them through support when they have issues.

    Only for the past several months I have noticed that my T-Bird was getting slower, and slower, and slower. 

    After I would open it up, and started managing the emails that were dropping into my Inbox, it would

      1. hang up while opening messages in the preview pane,
      2. hang up while dragging messages out of the inbox and into message folders in my sidebar,
      3. hang up whenever the heck I needed to do something really important when trying to compose a new message.

    It kept getting slower and slower.  I use very few add-ons for Thunderbird and even disabling them and running in “safe” mode didn’t help.

    Before chucking it all I decided to try one last time on the Interwebs to see if community knowledge could help. 

    Yep!

    Contextual note:  As I post this, I am running Mozilla Thunderbird release version 24.4.0 on a Win 7 x64 system with ample system RAM and i7 core processor.  Also had previously “compacted” all my folders as part of regular maintenance and ran SpeedyFox to optimize the databases.  I recommend both as part of a regular T-Bird user routine.

    After some web-searching I found the following article with tips that seemed promising based on user feedback in the comments:

    It listed a number of tips but the second of these made an almost immediate difference.

    layers.acceleration.disabled = true

    and

    gfx.direct2d.disabled = false

    and restart Thunderbird.

    To get to these settings in T-Bird 24.x.x, you need to get into a different editor than described in that post.

    Go to “Tools” --> “Options” --> “Advanced” (the gear icon) --> “General” tab

    …then select the “Config Editor…” button.

    Click “I’ll be careful, I promise!” button.

    …then (one at a time) type the preference setting shown above into the search bar line and change the preference value to as shown above after the “=” symbol.

    In my case, the layers.acceleration.disabled was already set to “true” but I did change the “gfx.direct2d.disabled” value to false.

    Next I downloaded and installed the “NoGlass” add-on for Thunderbird. It installs under the “appearance” section rather than the “extensions” but it went on with no issues and the visual difference with no Aero glass for T-Bird was negligible for me compared to the possible performance gain.

    Finally, installed and ran the freeware utility ThunderFix as was recommended.

    Yes, the utility is pretty old but it does still work just fine with the latest versions of T-bird. Be sure your T-Bird program is not running when you run the tool.

    Tip: It is an “installable” program, but if you know how, you can use other tools to “unpack” the installer files and just be left with a single portable exe file to use if you would like.

    After all that housecleaning Thunderbird is fast and responsive again.

    One more note: after running Thunderfix, you may find your email folders are just a slow to open initially (first time accessing only) due to T-bird having to rebuild the msf files it cleans up. Once you get past that, they are back to normal.

    Good luck,

    Claus V.

    PS: That “W6161X” is a reference I learned about this week to the federal insurance billing code for “bitten by duck” as spotted in this great legal info post. --cheers!