Earlier this week I posted about the really cool Windows PE 2.0 that was rolled out with Vista.
I mentioned that is was based on the Vista kernel, that it was 100% free, does take a bit of time to build (but isn't too difficult to do), allows you to boot a system from the CD/DVD, and can do all kinds of wonderful things. Also, besides being able to make a Windows PE disk, you can use it to make a Windows RE disk...something you would otherwise have to wait for Vista SP1 release to get.
Ho-Hum or Fi-Fie-Fo-Fum?
While I have been surprised at a number of posts I have written getting quite a lot of attention, it seems that Windows PE 2.0 is not a "hot" topic.
Granted, although WinPE 2.0 not a big secret on the web, it isn't one of the more well-known tools either. I have been surprised in my conversations with other techies that they have no idea it exists. It appears that for the most part it is a topic dear to only system boot-hackers (in a good way), hard-core Windows troubleshooting support techs, and Windows enterprise-system deployment specialists who know about the Windows Business Desktop Deployment (BDD) solutions.
Microsoft's Windows PE 2.0 really is an amazing tool/environment that comes with some awesome utilities and power.
There are a wealth of quality Linux LiveCD's that allow a system to be booted off a USB/CD/DVD media for recovery or repair. These ship with friendly and useful GUI shells that most Windows users would find comfortable with. For pure Windows-heads, there is also the BartPE builder which is based on Windows PE 1.0 (XP) and provides boot-cd support for many familiar Windows utilities and applications. It has been an indispensable part of my CD-case for years.
So with Windows PE 2.0 being easy to build, but having a very plain (read this command-prompt only) interface....I must grudgingly admit that I can see why it would not appeal to a wider audience.
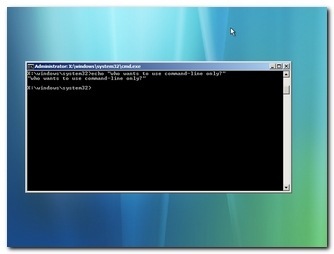
From this....Windows PE 2.0 (base build)
However, that is no longer a good excuse...
Bring on the GUI!
In my earlier post, I mentioned that there was a very good looking project called VistaPE.
It is a utility that helps automate the creation of a true GUI based Win PE 2.0 platform (like BartPE) that you can then easily run compatible applications with in a very Windows-like interface (i.e, point and click with desktop icons, Start menu, task-bar).
I had downloaded it, but it seemed quite overwhelming and I didn't have time to play with it in time for my last post.
I have now...
and it has knocked my socks off.
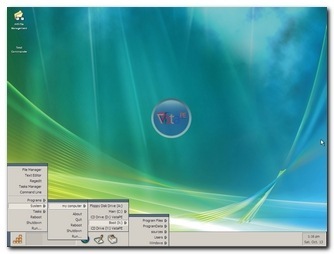
To this...Windows PE 2.0 (VistaPE build)
Which would you want to use?
How To: Build a VistaPE Boot Disk
What I want to do is walk you though using WinBuilder's VistaPE tool to build your own base build of a VistaPE (Win PE 2.0) boot disk. You can then either play with in in a virtual machine (MS Virtual PC 2007 works fine) or burn it to a CD or DVD media for emergencies.
The VistaPE website and tool(s) have done a great job of explaining just how to use their tool for maximum success. However it remains a bit overwhelming and even I ran into a few "gotcha's" at first. Hopefully this might make the tool approachable and spare you just a bit of my own grief.
For the sake of this, we will assume you are building on a XP-SP2 system (though Vista would be fine as well) with at least the main drive/partition formatted as NTFS. Also, be sure your drive/partition has enough space to build the project. One GB should do nicely for this base project, but two would be better. You will be creating an ISO file for the disk so you need that room for it as well as the build files you will be getting.
First: Get the "Dry-Ingredients"
- Download and Install the Windows Automated Installation Kit (Windows AIK), or
- If you have a Vista setup-disk (not the same as a system-restore disk), you should be able to use that instead and skip step one above. It is recommended you copy the files on that disk to your hard-drive just for performance improvement in building.
- Download and unpack WinBuilder to your NTFS partition. It is a .rar file format, but most all compression programs should be able to unpack it. If not, just get and use 7-Zip. I unpacked mine on the root at C:\WinBuilder. Note: I am using the download-link offered for the "Latest stable version 008 (02.04.2007)" on the download page for this guide. Again, you can actually put the file anywhere you wish, but it must be on an NTFS formatted partition!
Tip1: For an added bonus, I would recommend downloading and unpacking the following file handy: GImageX, but it is not required. If you want to skip this, don't worry about it now...I'm saving it for my next post.
Tip2: If you forget for some reason to do this on a NTFS formatted partition, when you run the final build file (virtually or off a burned disk) it will boot to a point but then stop at the following error: "...winload.exe is either corrupt or missing." That's because you didn't do the building on a NTFS formatted partition. If this is the case find and move your WinBuilder folder and contents over onto one and try another ISO build again. It should work fine the second time.
Second: Get the "Wet-Ingredients"
- Browse to where you unpacked WinBuilder and run the exe file.
- The version I am using reports "WinBuilder 072" in the title bar. If yours is different you probably can still follow the principles outlined here, but some of the references might not exactly match.
- Take a moment to examine the window. There are two tabs "Web" and "Download" as well as some icons "Play," Tools," and "Refresh."
- Click on the "Download" tab.
- The program goes to the default "Web Servers" checked in the bottom corner and via the net pulls down two default "projects" and their component scripts.
- On the left hand side, you should now see "Recommended" in a drop-down option box, with the projects "VistaPE MultiBoot (BETA)" and "VistaPE Main Site". Let's leave it on "Recommended" for this build run.
- Let's uncheck the "BETA" one for now, and leave just the "Main Site" project checked.
- Note that on the info area for this tab you should see that you are have 26 files selected and about 9.36 MB of data to download.
- Click the "Download" button at the bottom and the WinBuilder will begin fetching the files and scripts needed for your project. A "Projects" folder will be automatically created in your C:\WinBuilder\ folder (or whatever you called yours) and the files placed into there.
- On the right hand side you will see the detail elements being ticked off as they are obtained with a download status bar showing the progress.
- WinBuilder should restart when done.
Additional notes: If you want, play around on this page. Note that when you select other Web Servers, additional projects or project sub-elements appear. There are a lot of cool ones so take your time exploring. Also, under each project should be some "+" signs. You may expand these to see what the projects elements contain in more detail and select them to be individually included/excluded. Finally, the drop-down box allows you to fine-tune the project with "Minimum," "Recommended," "Complete," or "Beta" levels of element inclusions. Again, try different options to see what happens.
Third: Dump in the Bowl and Mix
You should now see that a third tab has been added. This is the "Scripts" tab. It has a four-tabbed element screen on the right with tabs for "Scripts," "Paths," "Log," and "Code Box." Now the fun begins!
- Click on the "Paths" tab and set your Source directory.
- If you are using the WAIK and installed it to the defaults, browse to the following location using the folder icon next to the blank line: "C:\Program Files\Windows AIK". Or,
- If you are using a Vista setup disk, you probably should have first copied the setup files to your drive, so point to that location, or the DVD if you didn't.
- Note: The Vista disk is not required...the WAIK installation works great by itself.
- The "Target directory" is set by default. I would leave it alone for now.
- The "ISO file" location and name is set by default. I would leave it alone as well.
- Click the "Scripts" tab (next to the "Paths" tab) again.
- If you also click the "+" on the left-hand side next to "VistaPE" project, you will see the project elements listed in detail. Each of these also has a "+" you can select to expand if you find it helpful.
Fourth: Season to Taste
- Back on the "Scripts" area on the right-hand side you should see two small and blue arrows (forward and back) separated by a light line. These allow us to step through the project elements and "tweak" the build. Let's do that now.
- Click the little blue "forward" arrow.
- Notice we are now in the "0 - PreConfig" sub-element area of the project.
- You may select the tool for WIM management. I recommend you click the drop-down and change to "ImageX" instead of the default option. To do this, you must have installed the WAIK. Leave the location path for WAIK below alone, unless you installed it in a non-standard location. TIP: I WOULD recommend browsing to the listed location, just to be sure the program picks up the location in it's settings. It has been my experience if you don't do that (browse and select anyway) that WinBuilder will revert back to WimUtil in the final building stage. I don't have any issues with WinBuilder, but on all my XP systems (Pro/Home) ImageX worked much better while WimUtil seemed to stall/pause.
- Click the little blue "forward" arrow again.
- We are now in the "1 - Copy Files" sub-element.
- If you are not using a Vista DVD, then uncheck the "Same recovery tools" checkbox. It won't hurt if you leave it checked but are using the WAIK, but doesn't hurt either to remove it if you don't.
- Notice the "Copy Custom Folder" checkbox. If you make a "\Custom\VistaPE" subdirectory in your C:\WinBuilder\ folder, then any files\folders added manually by you into this location will be added to the root of the media disk you are building. This is REALLY awesome as it lets you place additional 32-bit applications (most "standalone\portable" applications work great) on the disk for use.
- If you did download the GImageX utility earlier, go ahead and make the "C:\WinBuilder\Custom\VistaPE" subfolders and place the unpacked files in there. If not, no biggie...
- Leaving the "Clearing Target Folder" checked forces WinBuilder to empty the build-location folder it uses to create the disk, before it starts the build process. I generally leave it checked, but it does add extra time in building if you uncheck it. So let's leave it checked for now.
- Click the little blue "forward" arrow again.
- We are now in the "2 - New Hives for VistaPE" sub-element.
- Just leave "Clean custom registry files" checked.
- Click the little blue "forward" arrow again.
- We are now in the "3 - Shell & Config" sub-element.
- First we have a drop-down to set the FBWF value. I must confess, I didn't know what the heck this was at first. It is the "File-Based Write Filter" which allows PE "...to maintain the appearance of read and write access to write sensitive or read only storage. FBWF makes read and write access transparent to applications."
- I just left it at the default "64" setting. Once you get used to building, you can fiddle with higher values. 64 seems to work fine for my tests on various systems.
- Set your default screen resolution for VistaPE. While 800x600 should be compatible on most all displays, that resolution irks me. So I always set mine to 1024x768. Your call.
- Leave the "delete work folder' checked.
- Click the little blue "forward" arrow again...repeat as needed.
- Now you will jump down into "Apps" elements (and others) and can set custom options for these as you advance through them with the forward arrow. I would just leave everything set as-is for now. They are generally very self-explanatory.
- Click the little blue "forward" arrow again until the "6 - Finalizing..." section appears.
- Leave the "Pack boot.wim" box checked.
- Click the little blue "forward" arrow again.
- We are now in the "7 - Create ISO" sub-element.
- If you wish, you can give your volume name a different name.
- Let's leave the "Show mkISOfs window" and "Compatible mode" boxes checked.
We should now be all set. If you want to go back and check something in your project configuration, you can either click the little blue "back-arrow" or just click on the specific element on the left-hand side tree structure...just be careful to not accidentally uncheck something.
Fifth: Bake Well
All ready? Good!
I didn't mention this earlier, but you probably will want to be using a broadband connection to the net for this. We are about to download files to build certain parts of our creation and that might take a while on dial-up.
- Click the BIG blue arrow "Play" at the top-right of the WinBuilder window.
- WinBuilder will start to process the build.
- If you are prompted to install a driver, click "OK". This allows WinBuilder load the ImageX filter driver used to mount the WIM (Windows Image File) and make changes to the base one shipped with the WAIK or Vista DVD).
- If something errors out, that (usually) doesn't prevent the build process from completing, just that element may fail to work.
- Depending on the addition of extra files you want added, the copy files process may take a bit.
- You will see a nice progress meter for each stage of the process. If additional programs are needed, it will attempt to go and fetch them.
- For the "6 - Finalizing" stage, you may see a "boot.wim" window appear.
- Sometimes at this stage it appears to "hang" after a while (give it some time first you should be seeing hard-drive activity). You should notice a little new wimutil.exe icon in your system tray (by the clock). Click on it and see if there is a check next to "script paused." If so uncheck it and the boot.wim window should go away in a moment.
- I've noticed that sometimes it seems that WinBuilder wants to reset the WIM manager back to WimUtil, even though we selected ImageX earlier at the beginning. You might want to go back and confirm ImageX is set under the "0 - PreConfig" sub-element area of the project before clicking the "Play" button. That will (usually) ensure that you use ImageX instead of the WimUtil utility.
- If all is well you should see a DOS window for mkISOfs pop up and it will show the progress of rolling up the ISO file. Depending on your system and how many (if any) custom files you added, this might take a moment, but should be relatively quick.
- When done you will be back to WinBuilder with the "Log" window displayed.
- I usually have at least seven "errors" and you can explore this window if you want.
Let's Play!
At this stage you can go into the ISO folder of your WinBuilder location and find the ISO file.
To play with it you can burn the ISO to disk, using your favorite ISO burning tool. Mine is BurnCDCC for it's simplicity. Then in a system that has the BIOS set to boot from CD first, pop in the disk and boot the system.
I prefer to first test my boot-images using Virtual PC first to avoid making coasters.
WinBuilder does allow you the options (under the Finalize element" to burn the ISO directly to a cd when done as well as run the ISO in a VirtualBox session automatically. You do have to have VirtualBox (freeware) installed on your system prior to doing the build with this option selected, however. WinBuilder provides you a link to the site or you can get it here.
If all went well, you should see a GRUB4DOS boot loader. You can select the default (VistaPE) or one of several other options. This really comes into play in the advanced and beta build projects. For some of them you can also install MemTestx86, other Windows boot options, as well as Linux "livecd" builds. It is really amazing.
When the default configuration comes up, you should see command-line box with the Win PE 2.0 doing some initial PE 2.0 work. It's turning on some services and starting a network connection.
Then you will see the PE Shell Swapper window come up that will allow you (briefly) to select a different shell as well as screen resolution. Just wait for it to tick down or hit the "Go" button.
The default window shell should then load and you will have a task-bar, "Start" like button (the yellow dots) and a file-manager icon on the desktop.
For some reason Total Commander didn't seem to download and install nicely, so you might need to go back and manually download and add it to the build structure.
So what can you do? Well, a lot, but not too much in this basic build. But I wanted to cover the basic (easy) approach first as it was a quick and easy way to get familiar with the WinBuilder program and process.
Advanced Cooking Class
If this worked successfully for you and you are comfortable, try selecting the VistaPE Project again but going into all the detail sub-project elements and selecting them ALL or even maybe the VistaPE MulitBoot (Beta) at "Recommended" setting for your second attempt.
Then expand and go into the details "+" sub-project elements and click-away to your heart's content adding additional tools, recovery options, applications, office applications, Firefox browser...etc.
There are so many options and possibilities, it is simply amazing.
Once you have picked all the elements you want to add, and have everything checked off (tip: by default some sub-element items are not checked, even though the upper box is, to select all at once, uncheck the higher element then re-check it. The container objects underneath should all be checked now).
If you are doing the VistaPE MulitBoot (Beta) project, pay special attention in deciding if you want the "VirtualTest", "Slax Linux," and "OtherOS" options checked. That will greatly increase the download/build time as well as space required to build.
Make sure you have sufficient quantities of both! And forget about doing it without a broadband connection to the net!
Then follow the steps again to "Download" the script elements first.
Finally, when the downloads are done, go back to the "Scripts" and walk through all the options again and adjust accordingly. It will take much longer this time but the steps I've outlined should be pretty-much the same. Hit the "Play" button when you think you have it all set up the way you want and let the building begin.
At first it may be a bit confusing for the uninitiated in selecting your build project (VistaPE or the Vista PE Beta) and then selecting the default/additional script sub-project items and individual elements/programs for inclusion. I don't really feel I have done as good as I job as I would like explaining that part, but take a while to play with it and select down through the sub-project elements and you should see what I mean. You will pick it up quickly after the first couple of project builds you create. Then you can begin selecting other project servers and looking at the additional projects they offer as well.
Crème de la Crème (a VistaPE Maxed-Out Build)
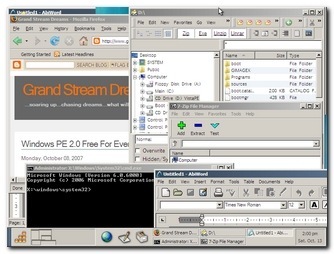
See what I mean?!!!
Final Thoughts
WinBuilder and BartPE are very similar in that you need to have some base Windows files to build the PE environments...with BartPE you have to have the XP setup disk and WinBuilder does not require a Vista setup disk if you have the WAIK instead. They both are based on scripts, but with BartPE, you must manually download the "plugins" into a plugin folder then download and configure (if needed) many of the actual applications you want to add. WinBuilder allows you to select the scripts/applications you want, then goes and downloads/and installs them for you automatically.
BartPE requires you to adhere to Microsoft's more restrictive PE 1.0 licensing requirements for usage. Win PE 2.0 is free and open for all...no version of Vista setup disk is technically required to build these disks. No limits on how many you may create or have in use at any given time.
BartPE does allow you to "slipstream" XP SP-2 in the build process if you only have a XP or XP SP-1 setup disk. This is a nice feature. Vista doesn't have SP-1 released yet and I don't know what real value it could add to the Win PE 2.0 environment. However, I am sure the the WinBuilder team will be taking this into consideration if they feel it is warranted, but I really don't think it will be (at this stage at least).
I love and will continue to use BartPE disks, but VistaPE will likely be an integral part of my CD-case from now on as well.
Props to NightMan and his team of contributors who have really done an outstanding job with this project. Version 10 (Beta) looks to be even better and I can't wait until it gets released!
Here are some more WinBuilder help website pages that might be of help:
I've tried to be as accurate as possible in my post. If you find something incorrect or radically different, please let me know. I hope that this encourages others to play with this powerful PE 2.0 building tool of NightMan's.
Next Post
The real reason why I've been posting on WinPE 2.0 will be revealed in all its glory!
Stay tuned...as cool as all this has been, it has just been buildup and foundational work!
We are about to enter into into Microsoft's "X" zone!
--Claus
8 comments:
truly a very good post for novice like me. Great Job thanks.
Wowm, Great Article.
Thank you very much for taking the Time!
Dave
@ Dave -- thanks for the kind words. If you haven't found it yet, check out this followup post on VistaPE that I did:
VistaPE WinBuilder 011 - Basic Walkthrough
Version 11 was even nicer with the GUI shell enhancements than the version noted here.
In fact, VistaPE version 12 beta 3 is even more refined than version 11. I've got a post update pending on this one. My only "complaint" is that on some recent Dell Optiplex systems (745/755), it doesn't pick up the USB keyboard/mouse drivers. I'm hoping that is resolved in the "final." I haven't had time to work out how to add them in manually myself just yet.
Also, version 12 beta 3 supports both the original Vista WAIK version as well as the Vista SP1 WAIK version, in case having that SP1 version of Vista PE 2.0 is important to you. Version 11 and earlier did not.
However, with version 11 of VistaPE building-folder security rights/privileges are very important so see that above linked post for those details...otherwise you will be pulling your hair out with dead VistaPE build attempts.
Stay tuned!
I built one on a new Dell 760 and you need to put the USB key in one of the ports on the back in order for it to pick up the keyboard and mouse, Not one of the ports on the front
@ Anonymous - Yes, you are correct and I was aware of that "trick" at the way beginning.
We usually use the two USB ports underneath the NIC jack on the back of the Dell systems for the USB keyboard/mouse.
I thought at first it would be that simple, but for some reason, none of the USB ports (front or back) on our Optiplex 7xx series systems would work with the standard VistaPE built disk.
Which is what got me started on this long journey.
I have an update on that that might make things easier for the VistaPE/USB keyboard bad behavior at least and hopefully this weekend I will have a chance to post it here. Come back later and take a look if you would like!
Thanks for taking the time to offer your observation. I appreciate it.
Cheers!
Claus V.
I tried to set the source directory to C:\Program Files\Windows AIK and it gave me an error:
Access violation at address 0056D11E in module 'WinBuilder.exe'. Read of address 0000000C.
I am using the latest version. Help please!
@Anonymous - You didn't say what OS you are running: XP or Vista...
Here are the things I would check:
Your building partition is NTFS formatted.
The WinBuilder folder (and subcontents) have the security permissions set at "everyone".
You are running WinBuilder as an "Administrator" level user.
I've run WinBuilder versions from this post forward under those above conditions without any issues on both XP Pro, XP Home, and Vista Home Premium versions successfully.
I'm assuming you've also tried downloading a fresh version as well from the website?
If you haven't found them you might also want to check out these updated posts on VistaPE building that are a bit more recent:
Custom Win PE Boot Disk Building: Step Four – Pulling it all together.Custom Win PE Boot Disk Building: Step Three – VistaPE 12 RC1 WalkthroughThere's probably a lot more in those than simple VistaPE building but you might find it useful as well.
Cheers.
Claus V.
Not sure why those links ran together:
Here you go again:
Custom Win PE Boot Disk Building: Step Four – Pulling it all together. - The whole set of links with the final wrapup.
Custom Win PE Boot Disk Building: Step Three – VistaPE 12 RC1 Walkthrough - VistaPE specific building steps.
CV
Post a Comment