Sunday, December 02, 2007

File Managers, Copiers, and Sync Utilities

Yep, more great utilities to share.

Take your time...lots of great finds here to pick from.

Kinda like the Hot-Wheels isle-bin at Wal-Mart.

Except these are all free.

Multi-pane File Managers

Be careful.

Find one of these you like and you might never open Windows Explorer again.

Ever.

FreeCommander - (freeware) - This application remains my number-on file manager. I think I would replace Windows Explorer entirely with it if I could.  It is a dual-pane view which is really handy for jockeying files and folders between two locations. It has  build in support for file compressing/decompressing and previewing compressed files, it can report sizes of files/folders, you can open a command-prompt in the location you are in, you can split a file into smaller portions, you can do a secure file-erase, use the built-in file viewer or editor, and the file/folder search tools are great.  Create and view MD5 checksums, and set all kinds of favorites, and preference settings. It has a wealth of built in utilities that makes it very sweet.  It also comes in a portable version!

FileCommander 5 - (freeware) - This is one bad-ass multi-pane file explorer. I don't say that lightly either.  Sporting a default 4-pane view, you can drag and drop, slice and dice file across multiple locations to your heart's content. It is portable and can be run off USB drives, CD-Roms, etc.  It picks up a lot of your favorite folders and software programs and makes them quickly accessible. you can split files, view running processes, set "bookmarks" to commonly accessed locations. The GUI interface is HIGHLY polished.  Definitely a keeper on any system.

mtExplorer - Multi-pane File Explorer - (freeware) - Like a more zen-like view? Try mtExplorer.  It can display anywhere from 1 to six explorer window panes at once. Really amazing.  It doesn't come bundled with any fancy utilities like the first two above.  The interface is kinda Windows 95, but it works well for this tool.  You can change views from icons, to list, to detail views.  Download and run. Settings are saved in a .ini file so it is also portable on USB drives.  Drag and drop files from the panes or use the right-click context menu.  Either way, it is a great, tiny and useful utility when working with files in multiple folder/drive locations.

Alt Commander - (freeware) - Kinda Win9x in the GUI, you can change the default font and make it a bit more pleasing to the eye.  It provides a very simple interface for dealing with files and folders. One bonus is the FTP client built-in. You can compare files and explore within zipped files before decompressing them.  Multi-file renaming is also supported.  Tiny and quick.

File Navigator - (freeware) - Want to go really Old School? This is the tool for you!  With a very DOS Console view GUI, it may (or may not) bring back warm Windows 3.x/DOS memories to your heart. It contains an internal file viewer, command line support, file name coloring, a FTP client, quick views, drag-n-drop support, file search filtering, file renaming, viewing of multiple archive file format contents on the fly along with integration for external archival applications, NTFS file compression/security support, folder comparison and synchronization, make file lists, customize the color scheme, storage of the settings in an .ini file (that makes it USB portable!).  It's fast, and l33t.

Advanced, Tabbed, or otherwise cool File Managers

While these don't support multi-pane views in the normal sense, they do provide tabbed or multi-view like file explorer views, along with a plethora of handy utilities for working with the files.

A43 - (freeware) - This used to be my number-one file manager before I found FreeCommander. It still is wonderful and I keep it around. The GUI interface is nice and pleasing to the eye. You have a Windows tree structure on the right, then to the left is the contents listing. Below is a third pane where you can select a quick-launch tool, a text-editor, a second file-explorer pane, a file finder, a hex-viewer, and an image previewer.  You can set favorite folder locations. It has a built in compression utility that lets to compress files in Zip format, into a EXE Zip unpacking format, a UnZipper and a UnRAR'er.  You can filter/mask views of files in a folder, split large files into smaller portions, and do a secure file wipe.  Pretty nice and still being updated. Works fine from USB.

XYplorer - (freeware) - I have to confess, I had seen screenshots before and not been really impressed or thought I would find it worthwhile.  I was mistaken.  On launch you get a fairly traditional view in a nice GUI interface.  To the left is the file/folder tree, on the right is a listing of the contents of the selected folder. Below is a series of tabs that lets you clearly view the selected item's properties, version, a preview if supported, a Raw view if supported, a file finder, and a reporting tab.  It really provides a pleasing way to view and explore your folders and files.  You can set viewing preferences and set favorites. It has quick-links to some key system locations. AND, it is tabbed-based (unlike pane-based) so you can open multiple tabs for different drives/locations. Some people prefer this approach over the multi-pane approach.  Yep, USB portable. Take a look.

UltraExplorer - (freeware) - Quite similar to A43. Viewable features can be undocked and floated on the desktop space. Toolbars as well.  Move buttons around.  Create a favorites pile (Drop Stack) of your files for quick access, build a favorites tree via drag-n-drop, open command line windows, filter views, create new tabs for multiple views. All standard right-click menu items apply.  Apply themes to the GUI. Can provide a multi-pane view, along with tabs so it is VERY flexible.  It might not have all the bells and whistles that the others do, but it provides great flexibility for customizing a Windows Explorer view just the way you want it to look.

File/Folder Synchronization & Backup Tools

These are the best ones I know of to keep folders and/or drives synchronized between locations.  Generally not for the average user, but if you like to keep a store of your favorite "portable" applications on your system, but maintain copies on your USB drive, they are dead useful!

DSynchronize - (freeware) - My all time favorite utility. The interface is very utilitarian but it is well designed and works flawlessly. Sync two or more folders on hard drives, floppy disks, LAN shares, USB media, CD/DVD's if drive/media supported, or an FTP server.  You can set time/date schedules for sync activities. You can preview sync activities before "applying" them to see what exactly will be occurring. You can set options to sync one-way or two-way (bi-directional). You may control if files are deleted, overwritten, newer-files only, and a few more.  It is very fast and easy to use.

Toucan at PortableApps.com - (freeware) - Very pretty, very simple, and very useful GUI interface. Designed with USB portability in mind.  Synchronize, backup and encrypt your data. Designed around 5 action tabs, allows quick function selections. This version features:
    * Four synchronization modes, copy, update, mirror and equalize.
    * Backup and restore in industry standard zip and 7-zip files
    * Encryption using the BURP updated blowfish algorithm
    * Command line support, allows you to create a batch file for repeated jobs
    * Portable variables, point to places on you USB drive no matter what its drive letter is.

SyncBack - (freeware) - easily backup and synchronize your files to: the same drive; a different drive or medium (CDRW, CompactFlash, etc); an FTP server; a Network; or a Zip archive.

Cobian Backup - (Open Source) - The developer explains that this is "a multi-threaded program that can be used to schedule and backup your files and directories from their original location to other directories/drives in the same computer or other computer in your network. FTP backup is also supported in both directions (download and upload). Cobian Backup exists in two different versions: application and service. The program uses very few resources and can be running on the background on your system, checking your backup schedule and executing your backups when necessary. Cobian Backup is not an usual backup application: it only copies your files and folders in original or compressed mode to other destination, creating a security copy as a result. So Cobian Backup can be better described as a "Scheduler for security copies".

Specialized File Copier Utilities - For the Pros

Roadkil's Unstoppable Copier - (freeware) - Use this tool to attempt to copy files from disks with bad sectors, scratches or other errors encountered during normal copy attempts.  If it can't copy the entire file perfectly, it will work hard to make it recoverable to the best degree possible.

SuperCopier - (freeware) - This is an unusual program in that when run (at startup or manually) it takes over from the normal Windows copy dialog box and process.  It provides additional information that might be useful to folks who do heavy or large-volume file coping. It provides lots more feedback as to the progress and status of file-copy activiity.  Not for everyone, but worth taking a look at.  Can be made portable if you don't want it installed in the system itself and just run it manually on demand.

CopyHandler (CH) - (freeware) - Works to copy/move files between locations in a manner more efficient than Windows copy methods. Supports copy/move but also enhances it by allowing for pausing, resuming, restarting, in addition to simple cancel options.  Over 60 optional settings to configure activity, provides detailed file copy/move feedback, can resume unfinished operations after system restarts (cool), can be set to limit concurrent copy actions and batch additional tasks in a queue to automatically begin. Can integrate with system menus.  Really, really cool (and portable). (download page link)

Advanced LAN Pump - (freeware) - This one is "designed for unbreakable file copying on Local Area Network Microsoft Windows (LAN Download Manager). The program can copy files and folders and automatically tries to restore copying process after an error occurred. The program has user-friendly interface, "Quick Info" graphical window with alpha blend channel, support drag&drop files, provides flexible copying process management. It helps you to save your time, network traffic and to decrease stress."   Note: the download link here isn't working, so I am linking to the last good version off of portablefreeware.  You can also find more polished (GUI) versions on the web at other locations but those do not appear to be freeware versions. (download and info page via PortableFreeware.com)

Pick one or two, or pick them all.

I carry them all on my USB stick.

--Claus

LinkFest: More Vista Tweaking (and some XP as well)

Got a lot of links to still post about.

Got lots of laundry and grocery shopping to do.

Got to drop by Mom's and say "I love you."

Here is part one of my Vista Pile

New Vista Tweak and Tip Arrivals

  • Vista Start Menu - (freeware) - Windows XP and Vista. -Use this to replace your XP or Vista Start Menu that provides an alternative structure to your program files, accessories, and other functions. Vista's new Start Menu layout can be a challenge finding things, but while you can revert to the XP-style, it isn't nearly as pretty. Vista Start Menu gives you a balance between both. In addition, it is designed around something called cognitive identification which is a fancy way of saying it works like your (well, most people's) brain organizes information. And if you delete an icon or remove an application, it doesn't shift the items around, it just leaves a blank-space until you clean it up. I am intrigued by this program. It looks very polished and seems to make a lot of sense. I am going to try running it on some of my test machines to see what I think.
  • Vista Transformation Pack 8 - (freeware) - Make your XP system look very, very similar to Vista. This build lets you apply an "Aero Glass" effect to your XP system without needing WindowBlinds now. Also included is the free WinFlip application which mimics the Flip3D task switching tool in Vista. It provides better compatibility with hotfixes, now provides a suggested setup configuration during application to the system, and included updated versions of all the mini-utilities that make it render the Vista effects. Do use this with caution, as some users report problems uninstalling and removing the "bits" that make it work. A System Restore point would be a good bet.
  • Stardock: LogonStudio - (freeware) - Customize your XP or Vista logon screen with your own image selection instead of the aurora image by default. Pretty safe tweaking.
  • Take Control - Easily Take Ownership of your Vista files - (freeware) - Want to delete, move, or modify a Vista system file? Normally this isn't easy to do. However, if you run this utility under an administrator account, you can do just about anything you want. Nice, but needs to be used with wisdom and understanding. Whack the wrong file and your system may not boot.

Previously Posted on Grand Stream Dreams

Making progress on the piles....

--Claus

Back to the Benches & Coming up to Speed

Last Sunday I posted a roundup of Windows system benchmarking tools I had been using in my pursuit of what combinations of memory we should go with on "nicer" older Dell systems.

Windows Benchmarking Software - A Grand Stream Dreams Production

We had three different hardware systems, and would be upgrading them to 1 GB of system RAM from 256 MB of RAM.

Although the hardware was different between them, research on Dell's website along with scans from Crucial led us to determine that PC2700 memory @333MHz speed would be compatible across all platforms.  So, we decided to go with testing a single 1GB stick configuration or dual 512 MB sticks, still netting 1 GB total RAM.

The tests were run, repeated, checked for consistency and trends analyzed.  When it was all said and done, the dual-stick combo won out...found to be moderately faster in testing over the single stick across all the different platforms.

So that moderate speed gain was the deciding factor?

Well, not really.  Actually the tests provided the justification we needed to say that upgrading these systems to 1 GB of RAM from 256 MB was noticeable and significant enough to justify the expense of upgrading them.

(And the masses of our customers rejoiced at this news, and there was much less gnawing and gnashing of teeth....)

While the dual-stick configuration was moderately faster, I doubt most of our customers could tell any difference when they run Internet Explorer to do web-work or in their Office or DOS (yes, still running DOS applications) software.  And price-wise the costs between the two were almost identical. No, the dual-stick configuration held one benefit: If we have dual-sticks in a system and end up finding one module goes belly-up in the fishtank, then we still have a 512 MB module functioning and the customer can continue to work while we order replacement RAM.

Redundancy.  It can be a beautiful thing in "goberment".

Memory and CPU Core Tools

While I was focusing on performance (and I say that loosely considering the systems we were examining) benchmarking, and shared those tools with you previously, I did actually use additional ones.

See, it was important to understand exactly what processor types and CPU speeds the systems had in them, along with the memory modules.

Sure you can right-click the My Computer icon on the Windows desktop and look at the properties, but they don't always tell the whole story.

Here are the utilities I used to accomplish that task.  They are very, very good at what they do.

And are free.

CPU-Z - (freeware) - Provides detailed technical information on key system hardware: The CPU name and number, core stepping and process, package, core voltage, internal and external clocks along with the clock multiplier, instruction sets, and cache information.  The Mainboard specifications along with vendor, model, and revision, BIOS model and date, chipsets and sensors, and the graphics interface, Memory frequency and timings, module specification (total and by module) vendor, serial number, timings tables. And finally the system information.  It is way-awesome, tiny, and USB portable.

CPU Rightmark - This site has a multitude of utilities worth downloading and using:

  • RMMA - (freeware) - very similar to CPU-Z but provides additional testing tools.
  • CPU RM - (freeware) - suite of tools to measure processor performance.
  • RM Gotcha - (freeware) - tiny tool to determine CPU clockspeed at any moment.
  • RM Clock - (freeware for personal,non-commercial, and non-profit use) - "a small GUI application designed for real-time CPU frequency, throttling and load level monitoring and on-the-fly adjustment of the CPU performance level on supported CPU models via processor's power management model-specific registers (MSRs). In automatic management mode it continuously monitors the CPU usage level and dynamically adjusts the CPU frequency, throttle and/or voltage level as needed, realizing the "Performance on Demand" concept."  Lots of cool activity graphs and a helpful system-tray icon with performance details. Neat!
  • RAMTester - (freeware) - checks reliability of memory modules under Windows. Writes patters into memory and then reads them, comparing differences.

SIW | System Information for Windows - (freeware) - provides a holistic view and report about EVERYTHING (software, hardware, network, keys) on your system along with a host of embedded system tools, and real-time performance monitors.  Oh yeah, it is a single exe file.  Very Portable. Very nice. Reports can be saved or exported in CSV, HTML, TXT or XML formats.  Runs on all Windows platforms including Vista and x64 systems, along with Win PE environments such as BartPE, ERD Commander, and WinRE.  How cool is that!

Tip 'O the Week: Boosting Dell D610 CPU clock-speed

So after I had cleaned up the test lab (my cubicle), the day was winding down Friday, I had loaded up my USB stick with copies of these utilities and was fiddling around with them on my own primary computing platform: a Dell D610 Latitude notebook, with a Centrino processor single-core (1.7GHz), and 1 GB RAM.

I was running CPU-Z and was surprised to see the CPU core speed logging in at .7 - .8 GHz, not the 1.7GHz reported by the system.  Every now and then it would jump higher, but then drop again.

I figured this was the Centrino processor in effect.  It was designed for mobile use, and cuts clock-speed (among other features) to improve battery-life.  It was throttling the CPU speed downward, almost by half, based on loads/performance automatically.

Some versions support a Intel utility called Speed-Step that allows adjusting of the performance manually, but the one in my laptop did not.

Hmm.  I normally don't unplug my laptop from it's docking station. And when I do take it into the field with me, usually I am doing long-term work, so I plug it into a power-outlet.  I wasn't concerned about battery life but would like to see if I can get the CPU running at full clock-speed.

What to do?

Since trying to hack or overclock a goberment issued notebook is generally frowned upon, even within the IT department, I wondered if there was an easier way to deal with it.

Diving into forums, I eventually found the trick.

With CPU-Z running in my dual monitor to monitor the effect, I

  1. went into XP's Control Panel,
  2. selected "Power Options",
  3. selected the "Power Schemes" tab,
  4. observed the setting was "laptop/portable" even though it was plugged in to the outlet,
  5. changed the setting to "Always On"
  6. Note: I could see the CPU change instantly in CPU-Z.  Throttling was disabled!
  7. saved the updated settings and was back in action at full 1.7GHz CPU speed!

Woot!

Pros: Running the CPU at full clock speed may improve application and system performance.

Cons: Run it on battery under this configuration and your battery may deplete faster.

Since I am almost always plugged in, I didn't care about that. Besides I could always change it back if I did need to go onto the battery power for a longer time.

And, I loaded up a great notebook utility in the process.

Freeware Notebook Utility Find 'O the Week: BattStat

Battery Status (aka BattStat) - (freeware) - For XP/Vista/W2K - This is a wicked-useful application for laptops.  It provides a system tray icon that provides lots of info on the power status of the notebook, internal temperatures, CPU speed and usage, power event settings, etc.  You can float a status-toolbar on your main display if you wish, or hide it. It can auto-run at boot. You can also single-click change your power scheme settings on the fly.  Oh, very, very nice!

It also provides details on you laptop battery itself; names, voltages, temp, design capacities, even wear-percentages.  Our new Gateway notebook has already lost 6% of it's capacity due to wear. Interesting!

For more details on this product see the product link above and read this review: Cybernet News: Laptop Battery Status

Happy CPU and memory monitoring, notebook CPU tweaking, and battery monitoring!

--Claus

Saturday, December 01, 2007

Three Unexpected Freeware Finds this Week

Time to switch gears for a moment.

Here are three really unexpected freeware finds I stumbled across this week.

Be amazed!

ASAP Utilities for Excel - Be an Excel Ninja, the Easy Way!

ASAP Utilities Add-in - (freeware for personal use) - I don't consider myself an expert Excel user. Advanced, yes, but not expert. Sure I do some neat things with Excel and know how to look up formulas on line and in my reference books. I don't do VBA stuff (much) but I usually can get the job done pretty painlessly.

Unfortunately there are a LOT of what seem to be simple things you should be able to do in Excel but just can't, by design.

ASAP Utilities puts almost a bazillion things you always wanted to do and have in Excel right at your fingertips

What can it do? The better question is "what can't it do?" Work with multiple sheets at once, filter or select cells even by font type,color, or style. Mass-protect all worksheets at once. Do tricky formatting of cells and rows with aplomb. Explore the full list of items (ASAP List of Tools) or download the excellent PDF guide.

For a recent review, check out this post from CyberNet News that led me to this product: ASAP Utilities for Excel

Stop now, go get and install it. Then come back and finish reading this post.

If you work in Excel, you need this tool.

It really is that good!

SwissKnife - Drive Partitioning and Formatting Made Easy

Sure, I just got done bragging about how wonderful the XP/Vista CLI interface tool known as DiskPart is for quickly making partitions and doing follow-up formatting chores: Command-Line-Voodoo: from fdisk-to-diskpart

SwissKnife - (freeware) - Windows drive formatting utility from CompuApps. Allows you to flexibly prep hard-drives in a great and simple GUI interface. Create, delete and format partitions on your hard disk drives. According to the product page, it has been tested on drives up to 400GB, and should in theory, support hard disks of up to 2048GB.

FAT16, FAT32, and NTFS partitioning is possible. Drive interface support includes IDE and SCSI and External interfaces such as Hi-Speed USB, Parallel port, PCMCIA, USB On-The-Go, Firewire®, SATA interfaces etc. Creates Fixed and Removable Disk Format types.

Key Features:

Formats faster than the OS (click on chart for details)
Allows change of cluster size during Full format or Quick Format

Divides a single hard drive into one or more partitions

Supports Hi-Speed USB, PCMCIA, SATA, SCSI, USB 1.1, and FireWire® external drives

Supports Fixed and Removable disk formats

Supports FAT, FAT32 & NTFS systems

Allows creation of a single partition of up to 2048GB of FAT32 or NTFS file systems.

Full format or Quick Format of existing partitions

Selective partitions can be modified for optimum flexibility

Supports XP (all versions), Windows 2000, Windows NT, ME, Win 9x

This installation version has a "safety-lock" that prevents the program from running on the active system partition. So you shouldn't be able to accidentally format your system partition.

Bonus version!

What is double-cool is that they also have BartPE plugin version for download as well. This version does not have the "safety-lock" so you can use it to do a GUI-based re-partition/format of a system using a boot-disk.

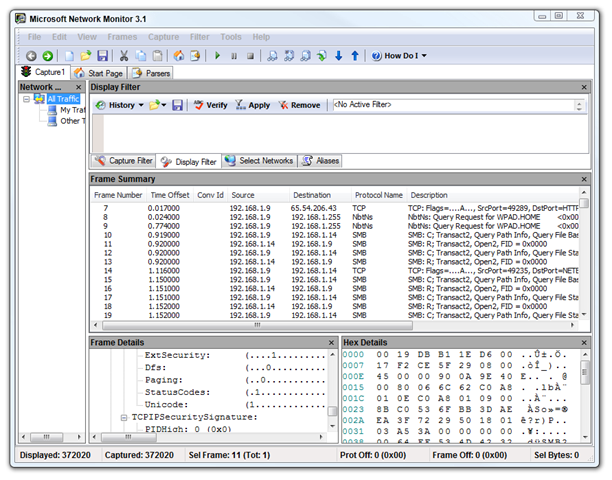
Microsoft Network Monitor v3.1

I love playing around with network tools and utilities. Check out this Grand Stream Dreams post of freeware utilities to see how wild I am about them: Free Network Utility Nuggets.

I was reading ComputerZen guru Scott Hanselman's exploration on why his file-transfer speeds in is custom-built home network were seemingly a "bit" slower then expected: Wiring the house for a Home Network - Part 5 - Gigabit Throughput and Vista. Scott has been detailing the design and implementation of a prime home-network build in his new home. Simply great reading.

Anyway, I was gleeful when I saw a screenshot from a network utility tool I hadn't seen before: Download details: Microsoft Network Monitor 3.1 (freeware).

I started drooling.

From the description page:

Overview

Network Monitor 3.1 is a protocol analyzer. It allows you to capture network traffic, view and analyze it. Version 3.1 is an update and replaces Network Monitor 3.0. Network Monitor 3.x is a complete overhaul of the previous Network Monitor 2.x version.

System Requirements

  • Supported Operating Systems: Windows Server 2003; Windows Server 2003 x64 editions; Windows Vista; Windows XP; Windows XP 64-bit

It is suggested that you have a CPU of 1GHz or greater, 1G or greater of Memory and 25 Megs of available Hard Disk space, plus room for capture files. Supports Vista 64 bit as well as 32 bit.

Not sure how it compares to my usual "beefy" tool of Wireshark, but it is always nice to have alternatives. And while the tiny and portable network capture tools I've noted in my Network Utility post are great for quick and easy captures when you have an idea what you are looking for, these bigger tools can really help when you have a lot of network traffic data to sort through.

Hope you find something here to download and enjoy!

More awesome goodness coming up tomorrow; family Christmas tree decorating schedule permitting.....

--Claus

Hell to Heaven: A Windows XP Journey Story

I've spent about two weekends doggedly working out this trip.

It actually started about three weeks ago when I traveled up to Tyler to help my dad put in his new Vista system.  In the process I (eventually) captured a image of his hard-drive to my iPod.

My plan was to place the image of his old system on a Virtual PC hard-disk.  Then if he ever needed any of his older applications we decided were not worth the effort of attempting to install on his new system, it would be easy for him to launch-n-go.

Sweet and slick! Right?

Since time was limited, I had to bring back his image with me and get it all configured and set up on my machine.  Then I would copy it back to his on a later visit.

Last weekend I probably spent over twenty-hours working on getting his imaged XP system up and running.

Eventually I gave up and deleted all my work (except for the original image).

This weekend I took it on again, fresh.

Tonight it is running in it's full glory, fully patched, repaired, and even running the latest XP SP3 release candidate.  I'm currently in the process of optimizing the virtual hard drive to pack it up tight again.

This is a post about the harrowing journey, and the unexpected surprises I encountered in the process.

Stage One: Creating the Virtual PC Hard Drive

This was the easy part.

I simply used the wizard in Virtual PC 2007 and created a new virtual pc session as well as a matching virtual hard drive file.  My own system has 1GB of RAM, but I felt spunky and set the VPC RAM to 512MB.  Dad's will have 4GB of system RAM so we can bump that up to 1GB later.

Next I built a new WinPE 2.0 boot disk and made sure I set it up to include the image.wim file that was the ImageX image of dad's system.  I created an ISO file of that boot disk/wim.

Then I launched the virtual pc session and set the session to use the WinPE 2.0 ISO as the boot disk. This worked great.

The system booted into WinPE 2.0.  I quickly partitioned and NTFS formatted the virtual drive.

Finally I restored the image.wim file to the drive.

Perfect.

Reboot.

And....blue-screen.

Stage Two: Passing through the Valley of the BSOD

I spent quite a pondering and working this one out.  First I experimented with different memory settings.  No help.  Then I tried rebuilding and reformatting the virtual hard drive, putting the image back down again.  No dice.  Even tried it in Virtual Box instead of Virtual PC.  Same thing.  Both seemed to perform about the same.

Then I figured, maybe the image was bad.  So I mounted the image.wim file in Windows Explorer and took a look around.  Looked nice and fine.  The files and all the file structure looked correct. I wasn't getting any errors during the imagex /apply activity and being able to mount it was a good sign.

The I remembered...I didn't run a Windows XP Sysprep on dad's system before taking the image. Oh! 

I know better than that, using sysprep at work almost every day of late.  Since it was a home system, I guess I got sloppy.

The system was booting, but when it was loading the hardware drivers, they were from dad's "real" system, not the correct ones for the virtual hardware system.  Lesson: ALWAYS run sysprep if you are going to port an image to a system (real or virtual) with different hardware. Always.

So I knew I needed to somehow get the system to do a new hardware/driver scan and configuration.

Sigh.

Stage Three: Windows XP Repair

I first tried some tricks by booting the virtual system with a XP SP2 setup disk and going into the Recovery Console.  Nope, not working.

So that left me with one last technique: a Windows XP Repair Install.  I knew that would do it.

Since I had a good feeling Dad's system was already experiencing some corruption issues, I decided this might be a blessing in disguise.

So I rebooted the virtual system again with it pointing to the XP SP2 setup disk in my cd-tray.

I worked though the steps to fire up a XP setup-repair action and in about fifteen minutes had it rebooted.  After the reboot the XP system setup was up in its graphical glory and I was rocking-n-rolling.  It picked up the hardware and seemed to be on its way.

Until I ran into what looked to be the deal-breaker...Dad's XP Home OS key.

Stage Four: Take the *(%$*%$*%& Key, Darn You!

At first the XP key issue seemed easy enough.  I didn't have it, and dad was unavailable to give it to me from the sheets we printed out back on his desk.

Then I remembered I had left a text-file copy of them on his old system's desktop.  Back to mounting the image.wim file in my systems Windows Explorer and viewing the file.  Got it!

I entered the key in, and....it wouldn't take.

I tried again....and it wouldn't take.

Hmmm.

Because this was XP SP2, I had to enter a valid key or I could not progress through the rest of the setup process.  I was at an impasse. (XP SP3 promises to do away with this "feature" and make it more in line with Vista.)

Eventually I decided to see if my own personal key would work.  I disabled the virtual pc network connection to ensure no "accidental" activations of my own key on his virtual system would occur.  I had enough headaches already.

Then I entered my key in and it took.

Problem delayed...for now.

This eventually got me to dad's Windows XP login screen.  I logged in to his account (administrator rights) and....was slapped with the Windows Product Activation (WPA) wizard.  I had to activate his copy of Windows before it would let me to the desktop.  This was because of the significant changes that were recorded going from his real system into the virtual one.  I had expected this, but....

Only now I had a new problem...that was my key on his system.  I had to change it back to his before I attempted activation.  Only how?  Attempts to cancel the activation wizard returned me back to the login screens.

Darn it.

There are a number of legit and "less than fuzzy" methods one can attempt to work around the WPA, I considered them, but felt very certain that if I could just get the key changed on the system, I would be good to go again. Besides...I'm a Good Guy.  But they were fun reading anyway.

I did try a variation on the last one.

First I selected the "Yes I want to telephone a customer service representative to active Windows" option.  (screenshot)

That got me to the next screen, "Activate Windows by phone" (screenshot).

At the bottom I have the option to "Change Product Key." I selected that option and got the "Product Key" screen where I could change the product key. (screenshot).

Only trouble was, every time I tried it, it failed to take and said it was an invalid key.

Grrrrr.

Stupid WPA won't take my dad's key, which was working fine on the other system and now it won't let me get the desktop to use some of my Windows Key finding/changing utilities.

Or could I?

Stage Five: The WPA Flea-Flicker Play

I remembered reading a long time ago that there was a VERY TRICKY but LEGIT way to bypass the WPA just enough to get into Windows.

A quick dig on Google found it.

The Tomorrow Times: How to login to an expired Windows

It went like this:

  1. Minimize the WPA wizard.
  2. Press-and-hold the next-to-useless Windows key on the keyboard and also press the "U" key.
  3. This launches the "Narrator" program for assisting the visually impaired.
  4. Select the little icon in the top left corner and select "About"
  5. "About Narrator" launches.
  6. Click the HTML link in there and Internet Explorer will launch.
  7. In the address bar type C:\ and <enter> and you are looking at your file-system in it's glory!

If you were lucky like me and the system opened the sidebar with the Windows system extras (My Computer, Control Panel, etc. icons) you are set!

So now I had temporarily bypassed the WPA enough to try running some of my Windows key finder/changer utilities.  But now I had a new problem.  How to get the programs on the virtual hard drive.

See, because I hadn't got to a point where I could install Virtual Machine Additions, I couldn't drag-n-drop the files.  Nor could I (yet) map a folder on my system to share. Virtual PC doesn't support USB connections so I couldn't use a USB drive. (Unlike Virtual Box emulator which does...)

So...I copied all my needed tools into a folder, then used Folder2ISO (freeware) to create an ISO file of them all.

Then I mounted that ISO file and was able to access them!

Sweet!

Only, try as I might, program after program failed to let me change the key.  They all failed.

Even the amazing and seemingly unknown standalone Windows Product Key Update Tool failed.

  • What it does

    The Windows Product Key Update Tool will make changes to your Windows installation to update your product key. In addition, the product key update tool will scan a number of key Windows files to determine if they have been tampered with. If tampered files are discovered the product key update tool will alert you before continuing.

  • Information collected

    Using the product key update tool results in information being sent to Microsoft. The information collected will not be used to identify or contact you. The information sent is standard Windows validation information as well as information related to the file tampering scan.

At this point I had come to consider the following scenarios:

  1. Dad's XP key was pirated.  Doubtful but possible.
  2. Dad's XP key was tied to a OEM system and would not/could not be used in a virtual session. This was a more reasonable explanation.
  3. Could be that his system (upgraded in place way-long ago from Windows ME) had since had its key removed as valid in the SP2 update files.  Possible, but most (but not all) XP Home keys should work from any XP SP2 setup disk.
  4. His system was just so whacked-out, it wasn't worth the effort.  But then, I'm not an IT quitter, which makes me pretty good at what I do for a living.
  5. I could just give up and set dad up to mount his image.wim file as needed if he needed any missing files. But this wasn't cool or particularly helpful in having "running" access to their old programs.   See my response in #3 above.
  6. I could call Microsoft and attempt to activate it over the phone.  Maybe they would give me a valid key.

By this time it was something like 3 am last Sunday morning and I had to get some sleep before work the next morning.

So I nuked the virtual pc hard-drive in frustration and walked away.

Stage Six: Regroup and Re-attempt Summit

This weekend I started all over again from scratch.  Fortunately I went quickly through steps One to Four, having learned a lot from my prior work.

In a while I was back staring at the WPA screen.

And thanks to Dwight Silverman's TechBlog post earlier that week which I had read, I knew what I had to do: TechBlog: Got them cosmic Windows Vista activation blues, mama.

Pick up the phone and call.

Worst they would tell me was that they key was bad or invalid to transfer to the new virtual system, right?

So I called the Product Activation help-desk number offered. In just a few minutes I was connected and after saying "Service Representative" enough times, got a live voice on the other side

I provided my information and explained what I had done, my technical skill level, and that I wanted to change the key before activating.

The rep seemed to understand and asked for dad's key.  I provided it and in about four minutes came back on line and confirmed the key was from a retail purchase of XP Home Upgrade. It should work.  I explained that it wasn't being accepted and wondered if they could provide a new key.  The rep politely recommended that I should perform a fresh XP install setup from a bare drive.

WTF?

I explained back that I had done a Windows Install Repair and it worked great.  I just couldn't get the key to accept as valid.

The rep politely explained that I should perform a fresh XP install setup from a bare drive.

I repeated what I said again, and this time he created a new service ticket and transferred me over to Microsoft Product support for assistance.

Sheesh. Give me a key dude, you told me dad's was valid.

So I next quickly (amazing!) was connected up with a Microsoft Windows Technical Support specialist,"MN"..  MN asked me the standard questions.  I provided them, explained again my technical Windows expertise (most days) and what and why I had done these things.  MN seemed to get it pretty quickly that I didn't want to do a WPA with my good key and wanted to change it back to dad's but it wouldn't take.  He was also impressed with what I had done capturing dad's old system's image and porting it into a vpc session. Like I said, cool stuff for us geeks.

We tried the WPA wizard again and, again, it failed to accept.

MN then suggested we try the aforementioned Windows Product Key Update Tool but the problem would be getting it to run since we couldn't get past the WPA.

I told him I had it covered and shared my "WPA Flea-Flicker" technique.  He was very impressed with this.  New to him!

I quickly had it up and going from the ISO.  The first time it ran, it failed again.

It should work.

I tried it again.

It failed.

He asked if I was connected to the Internet.

What?  No!  I still had my virtual pc session setting for the networking disabled so I didn't accidentally kick off my key.

He explained that the tool HAD to get to Microsoft's WPA validation servers to validate the key entered BEFORE it would make the change.

Oooohhh!

I enabled the vpc network connection. Re-ran the wizard.

Success! It changed the key.

A reboot and WPA was back up and the activation passed flawlessly.

(Note to self: the Windows Product Key Update Tool works great, but requires an Internet connection to work.  Don't forget this tool or this fact.)

MN said he had just been on the job for about two months after coming from AOL.  We talked shop for a minute, talked about help-desk support, the types of calls he had been taking lately (mostly how to deal with Microsoft games from older folks and their pcs) and how a fun and challenging problem was always appreciated in IT support.  We both seemed amazed at how smoothly this had gone after-all.  Then his supervisor barged in (I guess the call was running long) so when we got done wrapping up our call I asked to speak to the supervisor.  Which I did.

And lavished glowing praise on MN for his help and the (honestly) painless and quality tech-support (this time) and I think the Win Tech Support manager was about to have kittens of joy...Christmas appeared to have come early to him based on my feedback.

Hope MN gets a bonus or gold-star on the cubicle posterboards for this.

Stage Seven: Update, Update Update (repeat at least 80 more times).

Since I had done a Windows Install Repair, it wiped out all the post SP2 patches we had put on the system.  Now I found there were about eighty-three (83).

So I used heise-offline-update-40 utility, created an updated ISO, mounted it and applied the patches.

Reboot.

Check Windows Update on line to get the five or six the update tool misses. Reboot.

Next I installed the Virtual Machine Additions.  That significantly improved the vpc session performance...and made it much easier to drag-drop files from my system into the virtual one.

Now I decided to have some fun.

I shut it down and made a copy of the virtual hard drive and settings I had worked so hard to get going.

Then I rebooted the virtual session and ran the XP SP3 RC1 key hack and applied XP SP3 on the system.  No problems were encountered

Stage Eight:: Virtual PC Hard-drive Optimization

So now I had dad's system up and running perfectly (almost) in a Virtual PC system. It worked great.

So I followed my previously blogged steps and optimized the virtual hard-drive file:  Grand Stream Dreams: How to Optimize your Virtual PC Vista virtual drive...

Perfect!

The Windows Install Repair fixed dad's system previous Windows Update issues.  It works flawlessly again.

Only, still, when you launch Internet Explorer shortcuts from his system, IE still opens up in version IE 6.0.  If you launch IE from it's icon...you get IE 7.0  just like before.  Really weird.  But not a deal-breaker, by any means.

Stage Nine: WPA still lurks in the alley...

Still need to make a trip back (or burn the vhd file on a DVD) and copy it over to dad's new pc

A few lessons later he should be able to run his old XP Home system in a virtual pc session off his juiced new Vista system.

Only, I've been thinking...the virtual OS is picking up my AMD Athlon 2400 CPU processor.  When I drop it on dad's pc, it is going to see the CPU change and his AMD dual-core processor.  And I will bump the VPC session RAM setting to 1GB from 512MB as it is currently set.

Any bets if WPA kicks off again?

At least I am prepared now!

--Claus

More Freeware Defragging Tools

Back in April, I posted Defrag Mosaic in which I pondered the value of running file system defragment utilities on a XP/2000 system.

Robert Moir touched on this in his well-written post Defrag (pt 1) You can't measure it. 

This was later followed by a more detailed examination about methods to compare defragmentation tools' effectiveness: Defrag (pt2) You can compare products - but not easily.

If you haven't already read these, I encourage you to take to time to read what Robert has to say.

In my earlier post I mentioned eight file defraggers and one registry defragger.

Thin List - Free File System Defraggers

Since that post I've been using the following ones, generally depending on which pretty block-patterns I want to look at, more than any real technical evaluations:

Free Registry Defraggers

For registry defragging I've been successfully using these:

New Freeware File Defrag Tool

Defraggler - (freeware) - This is a new one from the crew at CCleaner.  It is similar to Contig in that it defrags a single file or files, one at a time.  The GUI interface is very well done.  It is easy to understand and select the target files to be defragged.  I really like using this tool to focus on my ISO files and other image-related files that can get really big and fragmented (.gho/.ghs/.wim/.pst).  Saves a bunch of time, especially before I start burning them to a CD/DVD.  I think it saves a bunch of time (well, ok, seconds).  I definately recommend checking this bad-boy out.  Bonus: Install the application and copy the exe from the Program Files folder to a USB drive and you are good to go portable!

Adding GUI to JkDefrag

JkDefrag v3.30 is as mentioned, a powerful and flexible defragging tool and optimizer for Windows 2000/2003/XP/Vista/X64.  Basically, you just run the file and it goes.  If you want more options, you really need to run it with command-line options.

To add flexibility for non-CLI folks, I've been recommending the JkDefragGUI wrapper for it by Emiel Wiedraaijer.  It is a simple multi-tabbed interface that really helps get at the power of JkDefrag. Download this program and launch.  It will automatically download JkDefrag and set it up in the JkDefragGUI folder you launched it from.  If it doesn't get the most recent version, you can download JkDefrag v3.30, unpack it, and manually copy it over the older version files in JkDefragGUI.

However, the other day I was looking for JkDefragGUI and stumbled across two other GUI versions that have sightly different approaches to the interface.

Pick any of these according to your visual preferences:

JkDefragGUI - The original GUI wrapper (to me) from Emiel Wiedraaijer.

JkDefragGUI + JkDefrag de - Markus Hörl's done a great job of making a colorful and tiny GUI wrapper.

JGDefragGUI - Dirk Paehl's GUI tool.  Very tiny and just a few critical options to pick from. If you like it really tiny and simple, this may be what you are looking for.

Lots of great tools here.  Find one or take them all.  All should be compatible with Windows 2000/XP/Vista.

Keep your system clean and orderly!

--Claus

Command-Line Voodoo: from fdisk to diskpart

I'm getting pretty comfortable now wiping volumes out to the bare-naked goodness.

Then creating new volumes and formatting them.

This is because I've been doing some heavy work with ImageX at work and one of the prerequisites to applying an image is making sure the drive partition is fresh and clean.  Since ImageX will overlay any existing files and file structure remaining on a drive, it is important to make sure it is prepped and clean before the image is restored.

So since I am working with Windows PE 2.0 now, I've become good friends with a new disk management tool from Microsoft; Diskpart.

But first a brief timeline for memory's sake.

First there were two friends, Fdisk and Format

When I first got started in Windows desktop support, we used Fdisk and Format commands to prep a hard-drive.

We would boot the system with a DOS 6.22 boot floppy with a few "extra" utilities copied to it and run FDISK. Stepping through the menu we would walk through the steps of creating the primary DOS partition, size it, set it active, and maybe create an extended partition.

Once done, we would then reboot the system with the boot floppy and format the partitions.

At that point we would copy the system files over to the active boot partition and work on building the DOS based system, loading network applications and software, etc.

Windows 95/98 machines followed a pretty similar process, only we would then run a Win 9x setup disk after manually prepping the drive, then do the system setup.

By the time we progressed to Windows 2000, the process had been made much simpler.  We were using Ghost/Acronis images at this point, so it was pretty much monkey places the boot image cd in the pc, presses "YES" and the image is on the drive.  Sure we could still do a manual disk partition and Windows 2000 setup from scratch, by why bother when we had pre-formatted images to use?

Windows XP came along and we were still using pre-created system images. They are big time savers.  Sure, we have XP Pro setup disks.  When ran we can follow the prompts to repartition the drive and then format it before loading XP on from scratch.  But why re-invent the wheel?

Time to make a new friend: DiskPart

What happens when a new hard drive gets replaced, but XP setup continually fails while creating the partition?  What do you do when you have acquired a new ImageX image, but need to put it on a bare drive or virtual hard drive?  If you have Windows XP or Vista PE, time to make friends with DiskPart.

Assuming you have the bare-drive ready and have a bootable Vista PE or XP disk, time to create an active partition.  In the command-line interface start typing and press <enter> after each line (assuming you don't get any errors.

  • diskpart
  • select disk 0
  • clean
  • create partition primary
  • select partition 1
  • active
  • assign letter = C
  • exit

What we have just done is ran the diskpart utility, selected the master drive (0), cleaned it, created a primary partition on it, selected it, set it to be the active (boot) volume, assigned letter "C" to it, and jumped out.

Now we just format the active partition that we created above. Type the following and <enter>

  • format C: /fs:ntfs /q /y

Now your drive is formatted with NTFS and ready to go.

Of course, the diskpart and format commands have a whole-lot more complexity than just this, but this is the quick and easy way to get a single partition ready to put an ImageX image on it.

What?

Don't have DiskPart because you have Windows 2000? Go download it from free direct from Microsoft: Download: DiskPart.exe

More Helpful Links

How to partition and format a hard disk in Windows XP - KB313348 explains how to use the XP setup disk to partition and format the hard-drive.

Microsoft Windows XP - Format - Microsoft XP Pro documentation on the format command. Note the undocumented format argument we used "/y" is not listed.  I believe it suppresses the usual confirmation request before formatting begins.

Blog - A geeks guide for building and deploy the perfect Vista image - Nice how-to on how to make a WinPE 2.0 boot disk with ImageX, capture a Vista image, then deploy it to a fresh drive.  Can be "tweaked" to capture other systems such as an XP or Windows 2000 system quite easily.

Known issues that occur when you create custom Windows PE images from Windows Server 2003 Service Pack 2 by using the Windows Server 2003 Service Pack 1 version of the OPK tools - Microsoft KB933510 touches on many of the things we have already covered.

Microsoft Windows XP - DiskPart - Microsoft XP Pro documentation on the DiskPart command. Lots of good and helpful stuff here.

A Description of the Diskpart Command-Line Utility - Microsoft KB300415 in all its illustrative glory.

Using Diskpart to create, extend or delete a disk partition - Great post by Tim Fenner of WinComputing on using Diskpart to create a partition, extend a partition, delete a partition, and finally, wiping (zeroing out) a disk with diskpart.

Kinda-Related Links -- Good to know

Oscdimg Command-Line Options - Microsoft TechNet info on the Oscdimg command. This is the one used to build the ISO image file for the WinPE 2.0 disk you must make.  TIP: if you try to burn a DVD sized ISO with the normal instructions it will error out.  You must use the undocumented "-m" argument in your string to force it to build the ISO over the normal CD-sized ISO size.  Use the -m switch to override the creation of ISO images larger than 700 MB

Example:

oscdimg -n -h -m -bc:\winpe\etfsboot.com c:\winpe\iso c:\winpe\winpe.iso

Why would this be important?

Well, if your imagex wim image is about 3.4 GB or less, you can actually include it in the WinPE 2.0 ISO build process and have your image on the same DVD as your WinPE boot disk with ImageX.  Great time saver. 

I'll have to do a walkthrough guide on this soon as it is pretty easy and really cool once you got the steps in front of you.

Repair XP - Tons of XP Repair "How To" resources and links for doing just about all kinds of repairs on an XP system.  Great stuff to bookmark.

--Claus